Welcome to the AgPRO Book-IT
Online Booking Calendar
Getting Started
Installation
How AgPRO Book-IT works
Navigating the Features of AgPRO Book-IT
Setting Up Your Field Trip Calendar
Default Email and Appearance Settings
Event Basics
Two Types of Events
Single Event versus Event Series
Availability
Pricing types
Payment Options
Extras and Add-ons
Reservation Lockout Period
Multiple Calendar Views
Event-Specific Confirmation and Reminder Emails
Managing Your Calendar
Editing Events
Creating Copies of an Event
Editing or Cancelling a Reservation
How Reservations Work for the Customer
How Reservations Work for You
Scheduling
Reporting
Invoices and Receipts
Exporting Customer Information
Customer Payments
For Group Reservations
For General Admissions
Archives
Getting Started
BACK TO TOPInstallation
Before we can install AgPRO Book-IT and link your booking calendar from your existing website, we must have all of the information requested from the Customer Enrollment form. We will notify you by email when your field trip calendar is ready.
BACK TO TOPHow AgPRO Book-IT Online Booking Calendar Works
AgPRO Book-IT is a web-based application, which means that AgPRO Book-IT is computer software that is not stored on any one of your specific computers. Instead, AgPRO Book-IT lives on our remote servers and can be accessed from any computer or smart phone with an Internet-connection. All of the data on AgPRO Book-IT is displayed in real-time.
The AgPRO Book-IT Field Trip Calendar is divided into two areas:
You can think of the first area of AgPRO Book-IT as your dashboard. The dashboard is a series of password-protected pages that only you can access. Here you will be able to perform administrative tasks for your calendar, like creating new events, viewing upcoming reservations, printing reports, etc. In your welcome email, we will provide you with a link to your dashboard, and it is important that you save this information in a safe and accessible place.
IMPORTANT: Anyone with your link, your administrative login ID, and your password will be able to login to your Dashboard, so be careful how you protect and/or share this login information. We will never provide access to your dashboard to anyone other than you.
The second area of AgPRO Book-IT is your public calendar. Your calendar is linked from your website and is visible to anyone who follows that link. Your calendar shows all of the events that you currently have scheduled using AgPRO Book-IT, as well as the number of available spaces for those events. Your public calendar does not show any private information like who has made a reservation, personal contact information, payment information, etc.
Click on the link in your welcome email to access the login page for your dashboard. For your convenience in the future, you might want to bookmark this page or save it as a favorite on your computer. Next, use the user ID and password provided for you to login to your dashboard, and then click Login.
BACK TO TOPNavigating the features of AgPRO Book-IT
The first page you'll see is the dashboard, once you're successfully logged in.
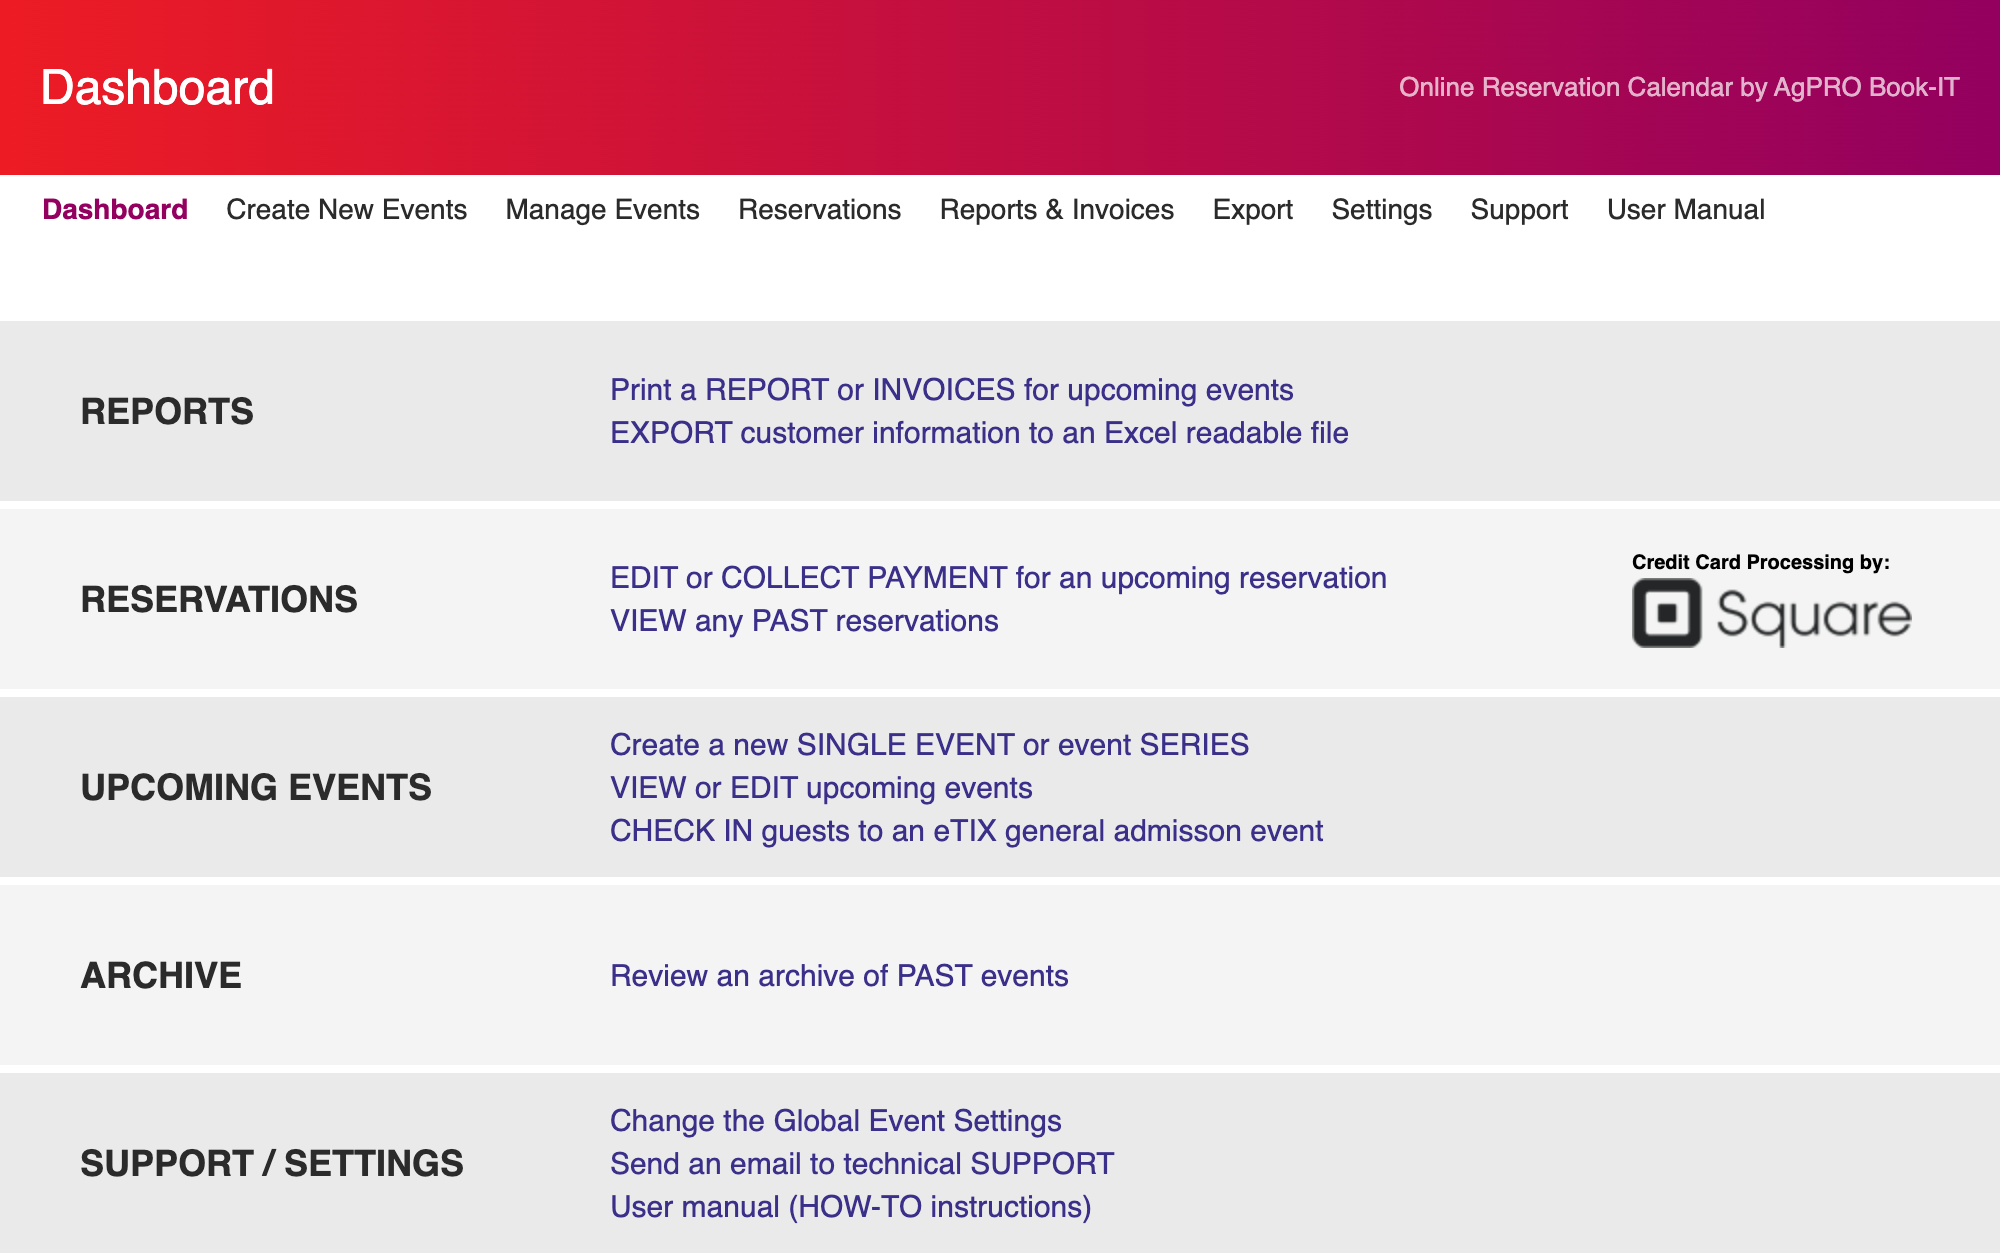
On this page, you can see a number of links, including Create a New Event or Print Reports and Receipts. All of those links go to other pages in your AgPRO Book-IT system. Each of the links available here is also available along the top of every page in your dashboard, so you can always navigate from any page to any other page without having to return back to the dashboard.
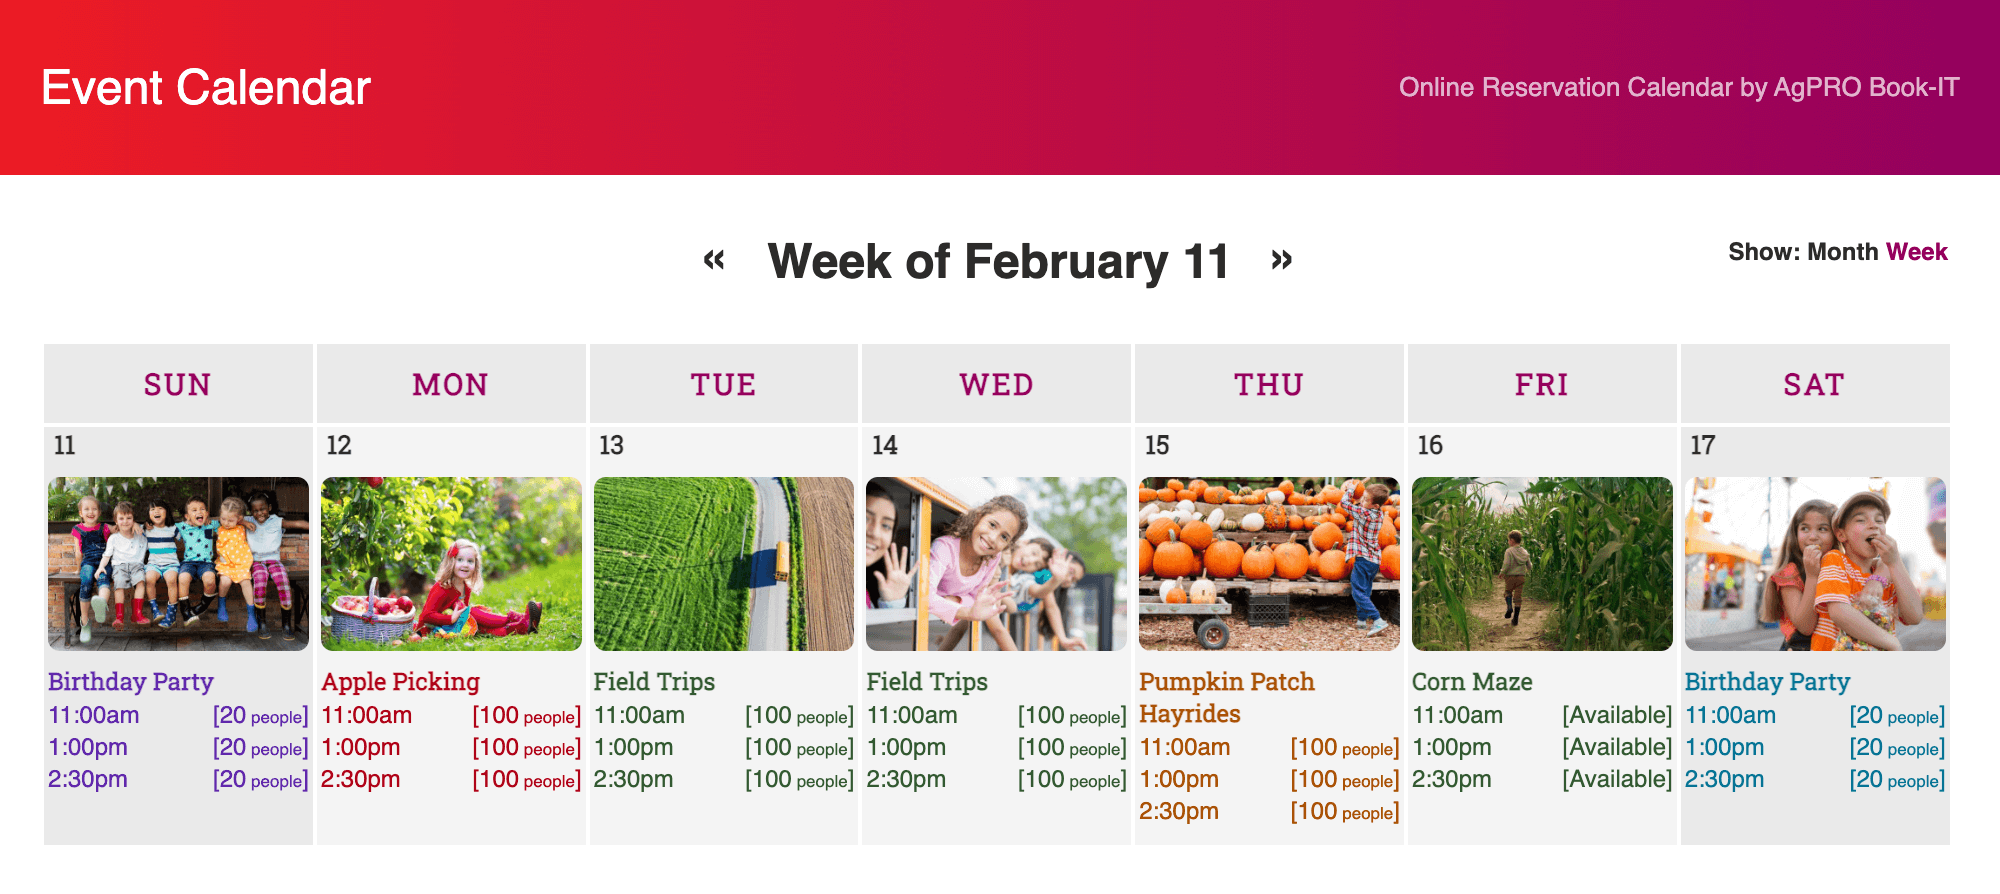
Once you've create a few events, the public calendar that your customers access from your website will look something like this:
Setting Up Your Calendar
BACK TO TOPDefault Confirmation and Reminder Emails
Once you login, you are ready to set up your calendar and create your first event.
All of your customers will receive a confirmation email after they make a reservation, and they'll receive an automated reminder email closer to the time of the event, a feature you can disable if you prefer. You have the ability to customize your confirmation emails and reminder emails in two ways: either globally (applied to all reservations at your facility) or by event (applied to reservations only for a particular event).
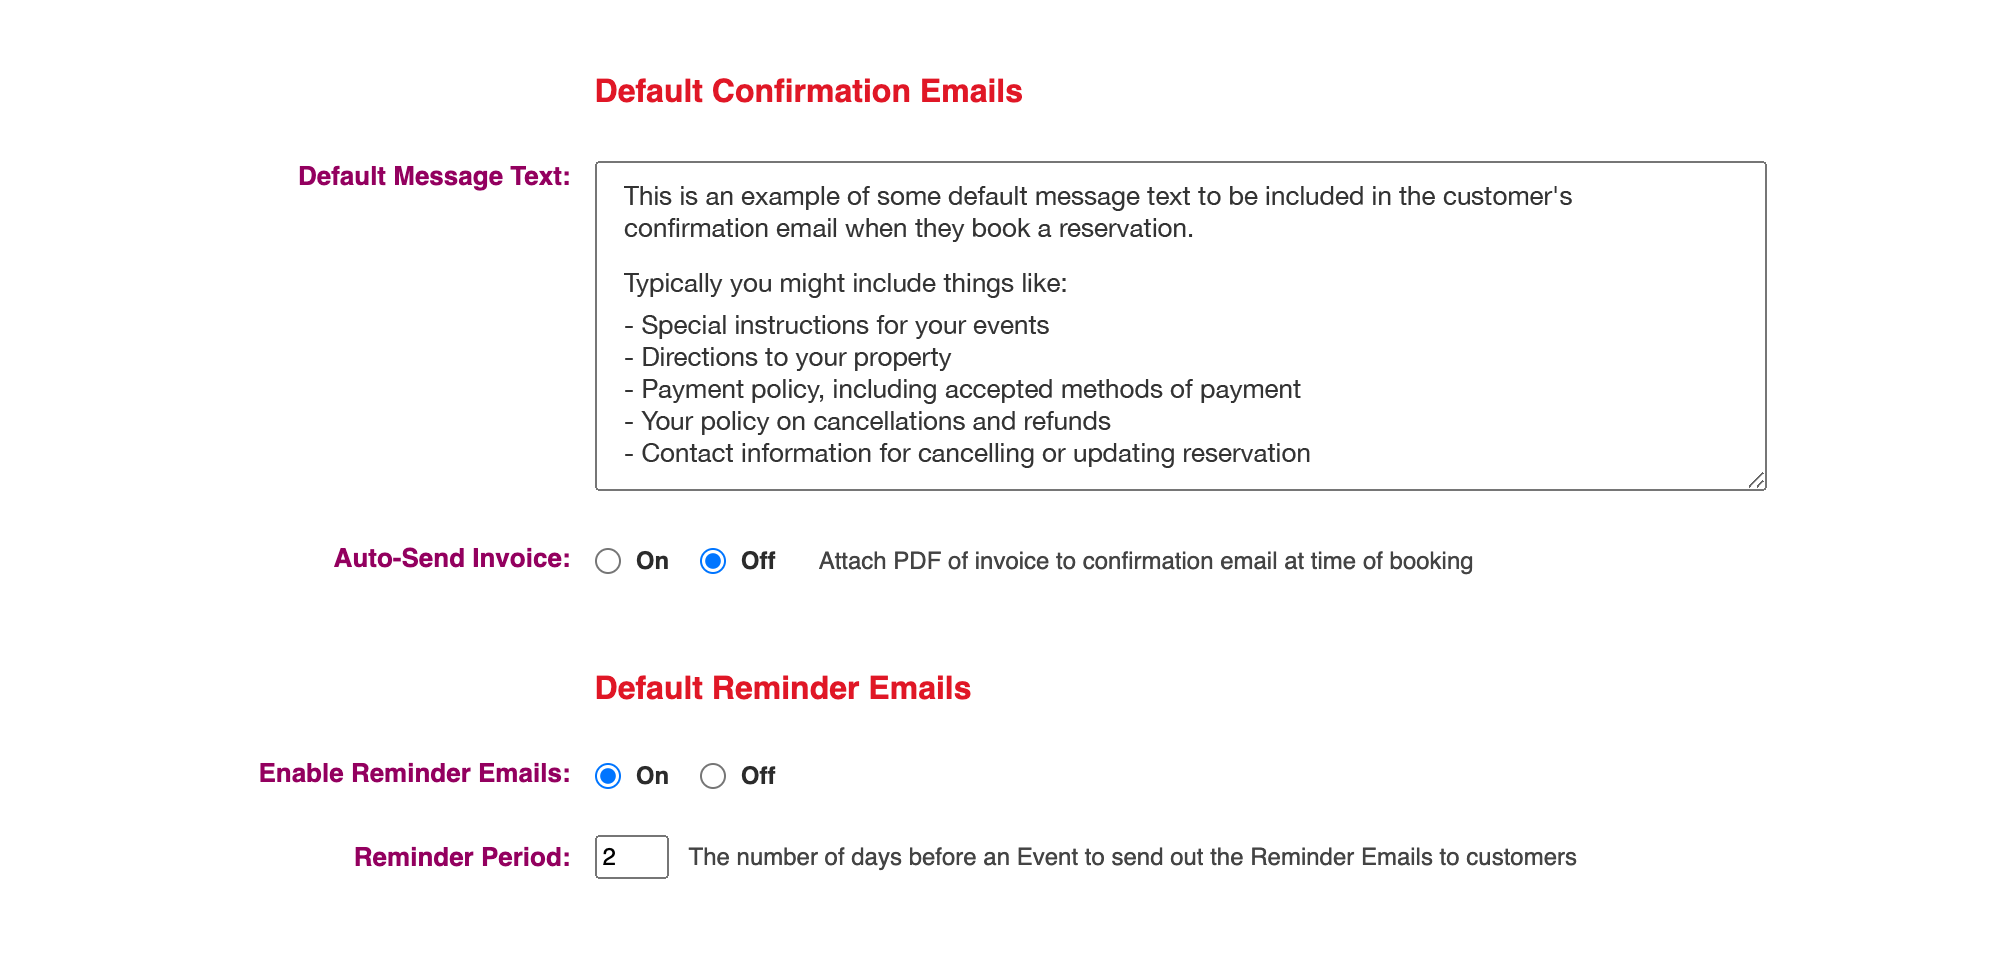
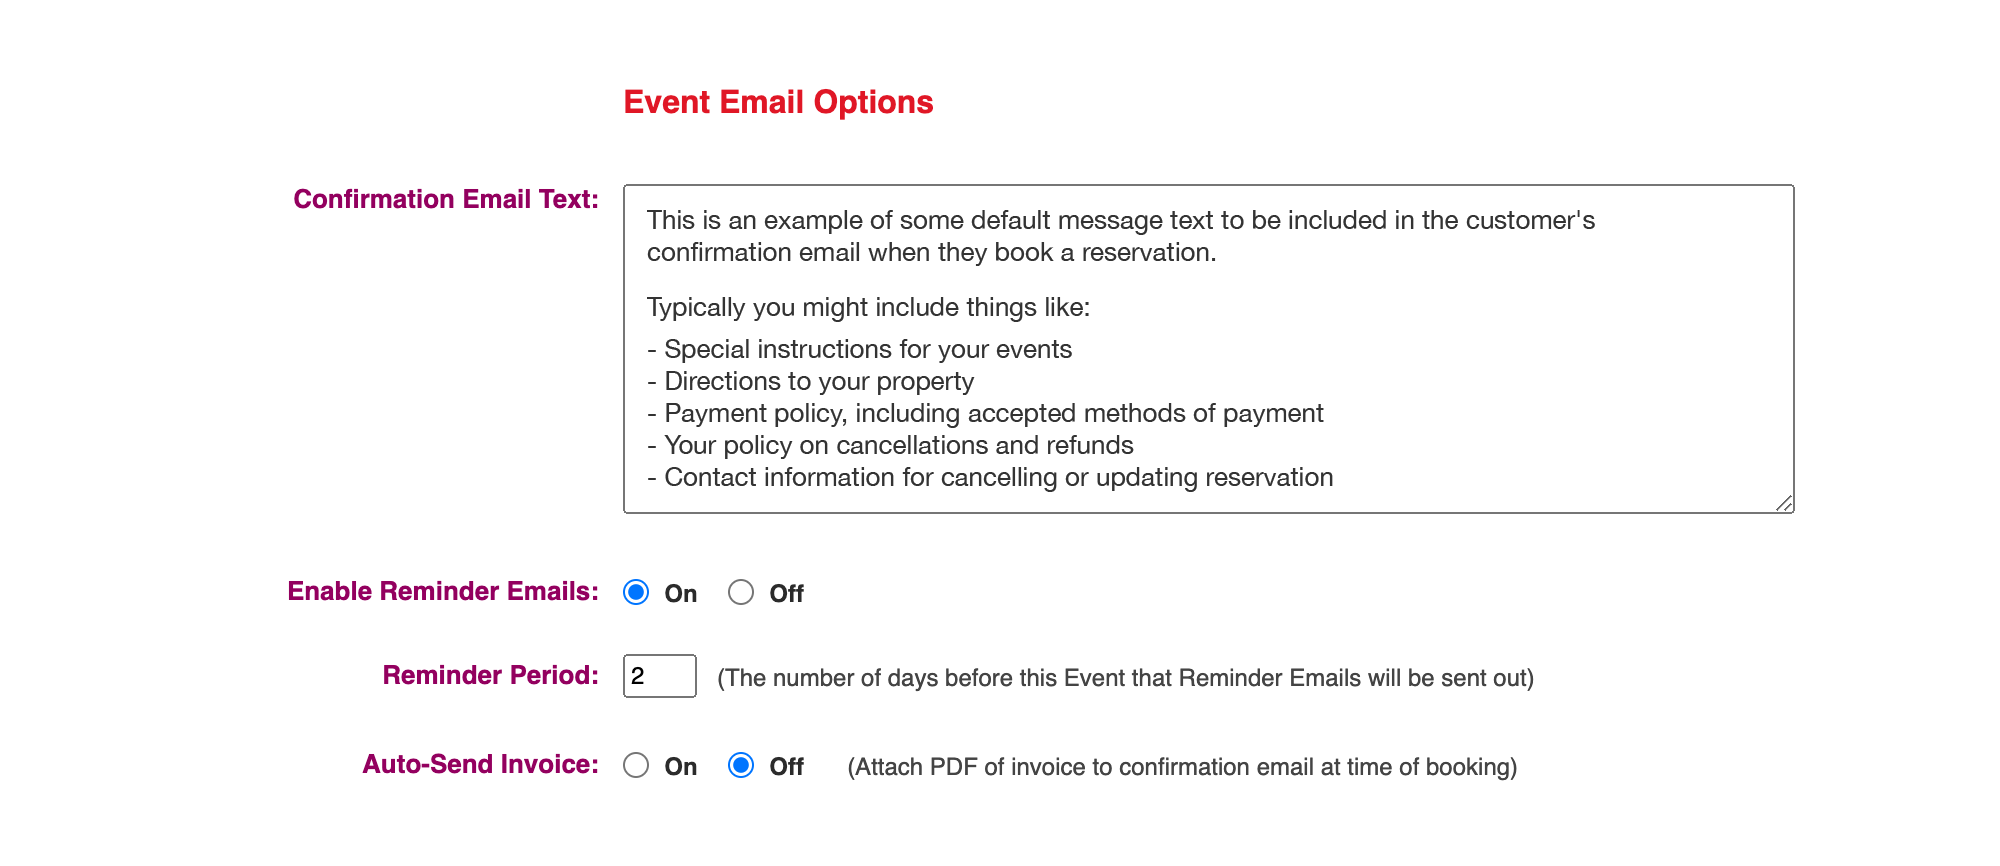
To set up a default email for all reservations made at your facility, click on Settings. Here you can enter the text you would like every customer to receive by default, and we've included some suggestions to get you started. You can also choose whether you want your customers to receive a reminder email before the event (containing the same information as the confirmation email) and you can also set the default period for the reminder email.
Since the default confirmation email and reminder email options apply to all events, we recommend that you set those options first, before creating events in your calendar. After making whatever default choices you would like, click on the Update button to save your changes.
Choices you make on the Settings page of your Dashboard will be used globally, meaning by default for all reservations. You can also create event-specific emails by editing the confirmation email and reminder email options when creating a new event (more on that later).
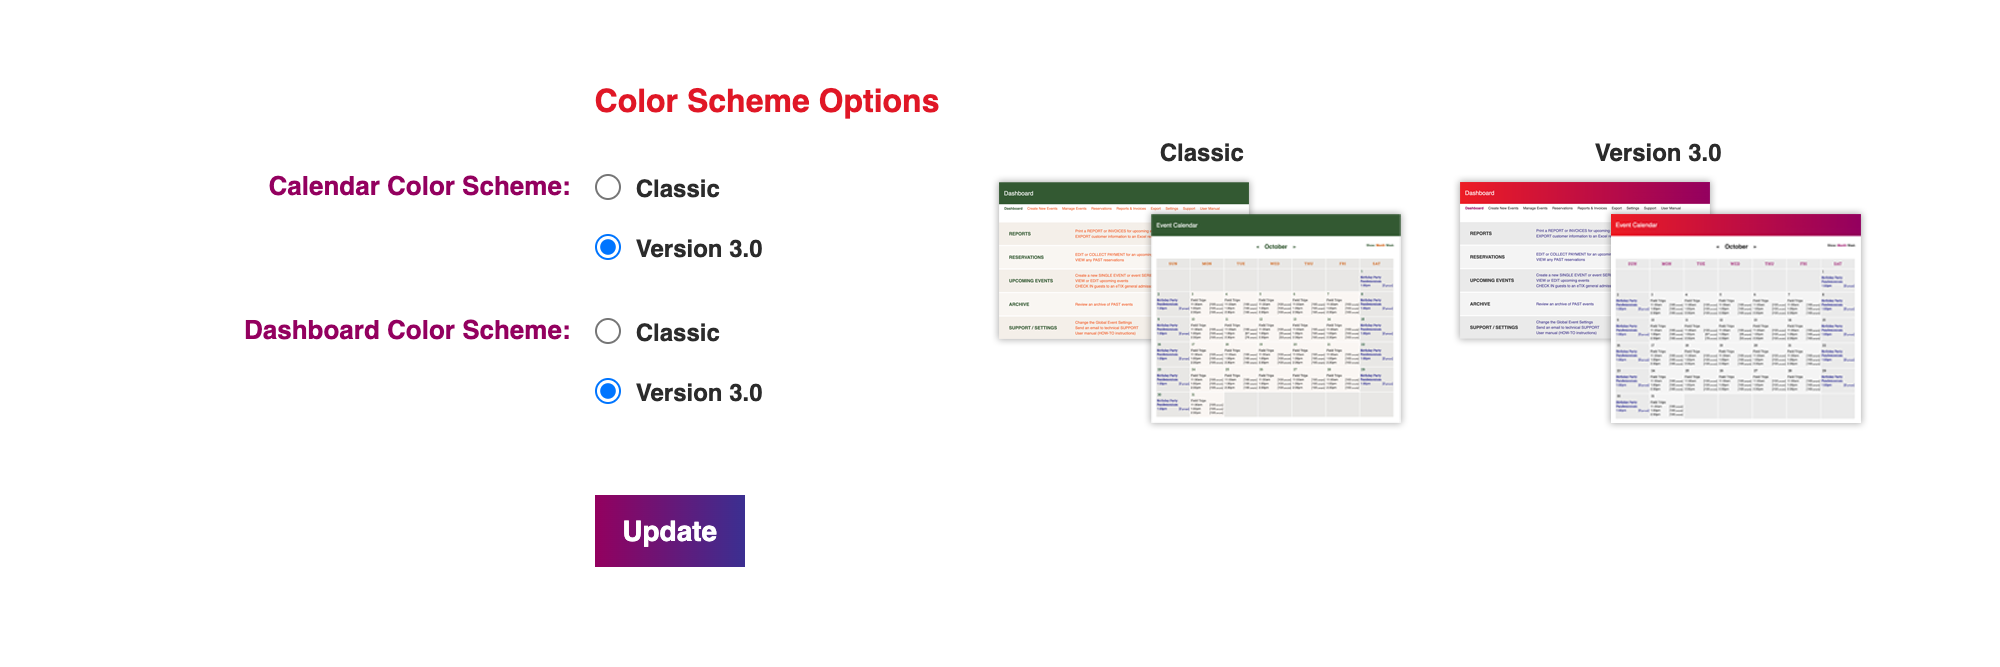
While you're in settings, take a moment to choose a preferred color scheme for your dashboard and public calendar. Later, you'll also be able to customize the colors for a particular event.
BACK TO TOPEvent basics
To set up an event, simply click on Create New Event and you will be directed to the new event page. The text you enter and the options you select will be visible to your customers on your public calendar.
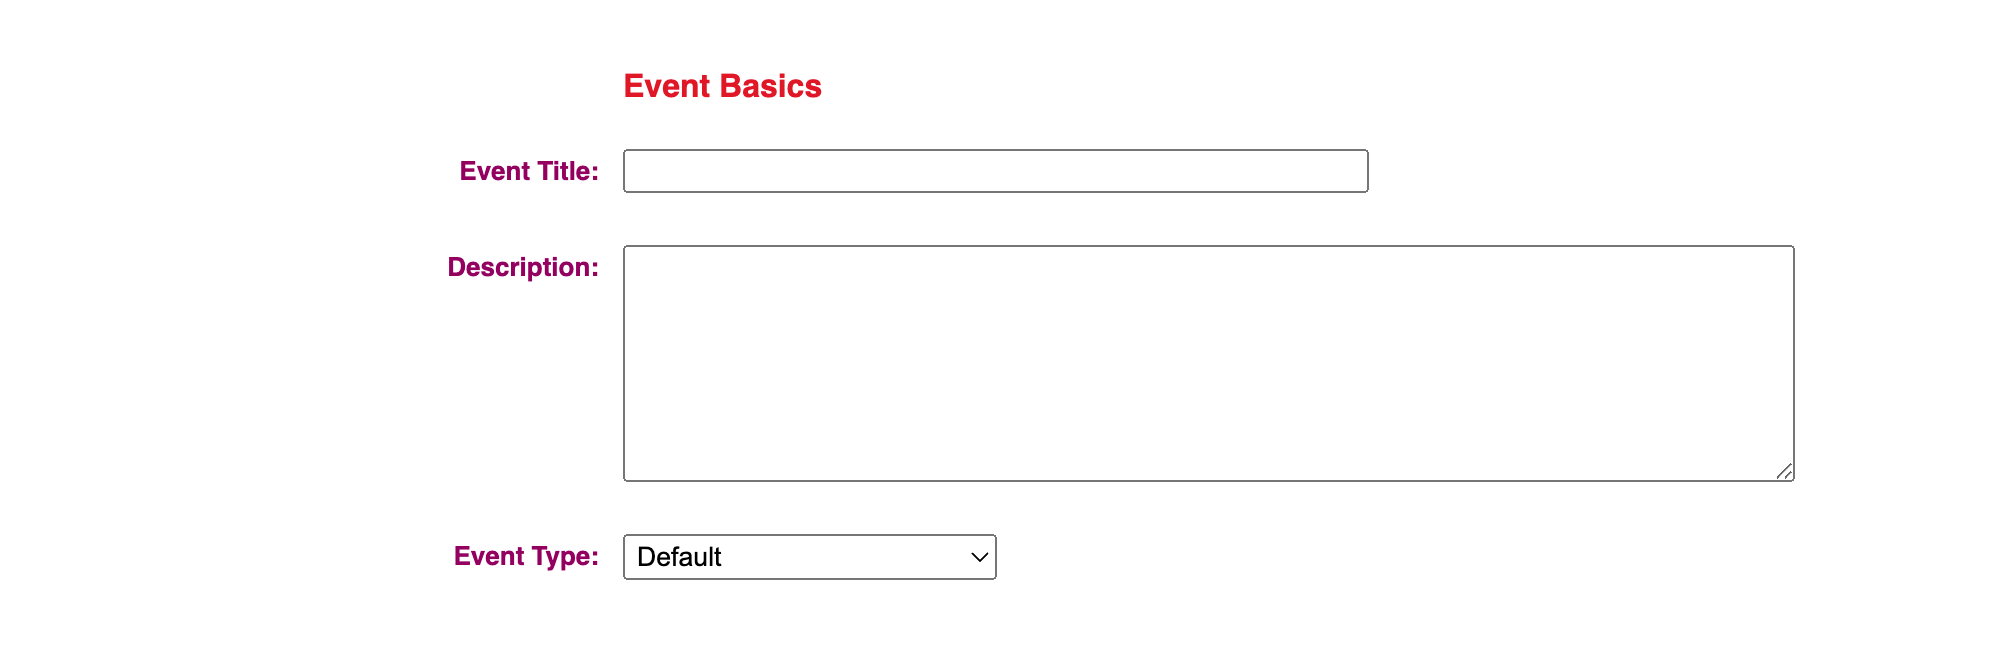
Enter a Title (like "Pumpkin Patch Field Trip", for example). You might want to choose a name that's not too long so that it will be easier to read on your calendar. And be sure to add a Description of the event too. Here's a great example:
"Your students will love learning as they see a pumpkin plant in all phases of growth, take a hay wagon tour around the farm, spend time at our petting zoo, and end up at the pumpkin patch where each student can select their very own pumpkin to take home! Field trip price of $5.00 per person includes one pumpkin per student. You can add a juice box and a slice of cheese pizza for an extra $3.00 per student."
And if you scroll way down the Create Event page, you can assign a Color Option for this event to display on your public calendar. Charcoal gray is the base color, but you can choose from seven others. For example, you might use green for field trips and red for birthday parties.
BACK TO TOPTwo Types of Events
Book-IT 3.1 supports two types of events: Group Reservations and General Admission (sometimes referred to as "Ticketed Events"). Group Reservations allow for per-person availability and per-person pricing, as well as per-group availability and per-group pricing. (More on those options below.) General Admission allows for only per-person availability and per-person pricing. The only other difference between Group Reservations and General Admissions is the check-in process. At check-in, a Group Reservation is pulled up by the name on the reservation. Check-in for General Admission is streamlined to only a four-digit code, allowing for a speedier check-in to keep your entrance lines moving for busier events.
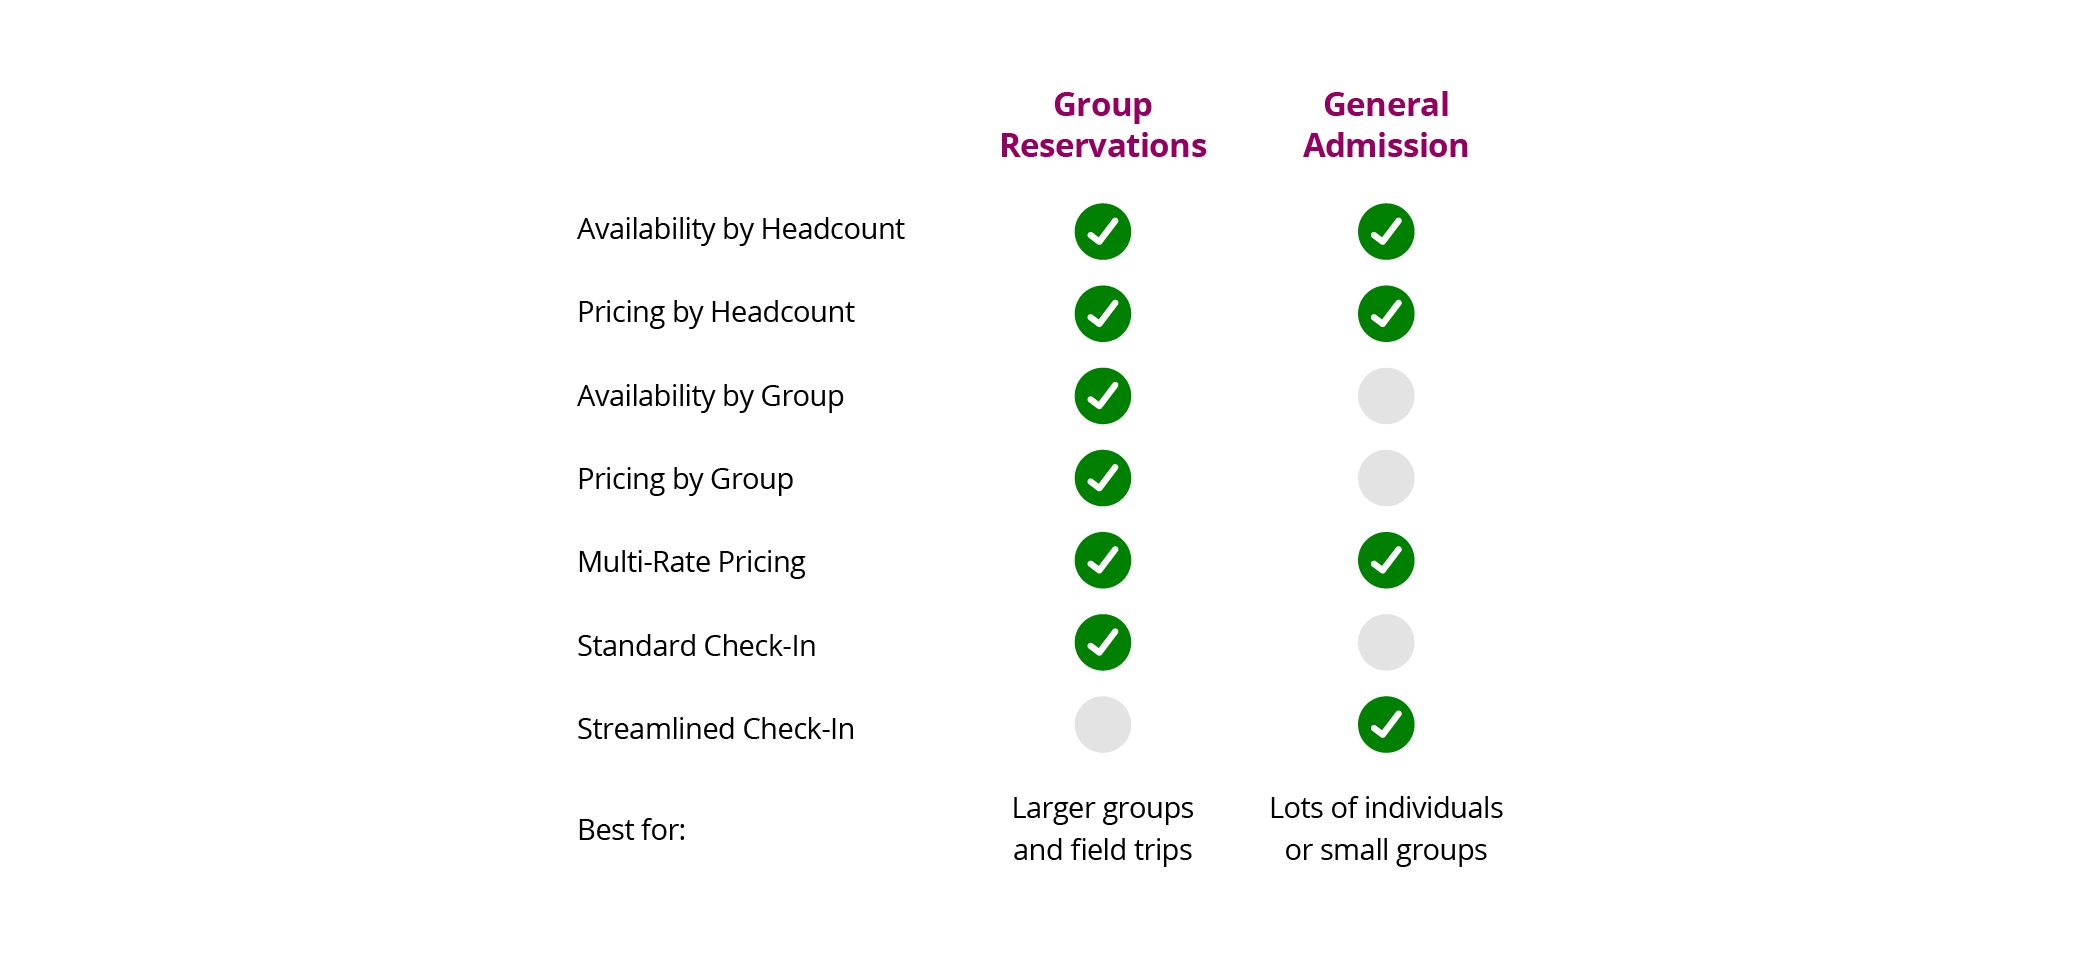
As a general rule, General Admissions are better when you’re expecting large numbers of small reservations (like for a harvest festival), and Group Reservations are better when you’re expecting a small number of larger reservations (like for field trips).
BACK TO TOPSingle Event versus Event Series
Two buttons on the Create New Event page switch you back and forth between Single Event and Event Series modes. A Single Event is a one-time event that happens on a single, particular day (like a concert, for example). An Event Series means your event is available on multiple days and/or with one or more starting times on each day (like school field trips that are available Monday through Friday, during the month of October, with starting times at 9am, 10am, and 11am, for example).
NOTE that creating a new series of events is essentially like a shotgun blast to populate your calendar with individual events. If you ever want to make changes later to the details of these events, each instance of this new event series will need to be edited separately. This means you cannot edit all of the instances of an event series at the same time, so it is important to ensure the details of the event series are exactly what you want.
 BACK TO TOP
Event Options
Once you select the type of event, you'll see a number of options relating to that type of event, including the Event Availability and the Event Pricing. Event Availability establishes how many people or groups can attend a particular event on the calendar. Event Pricing is the method used to calculate the price of a booking.
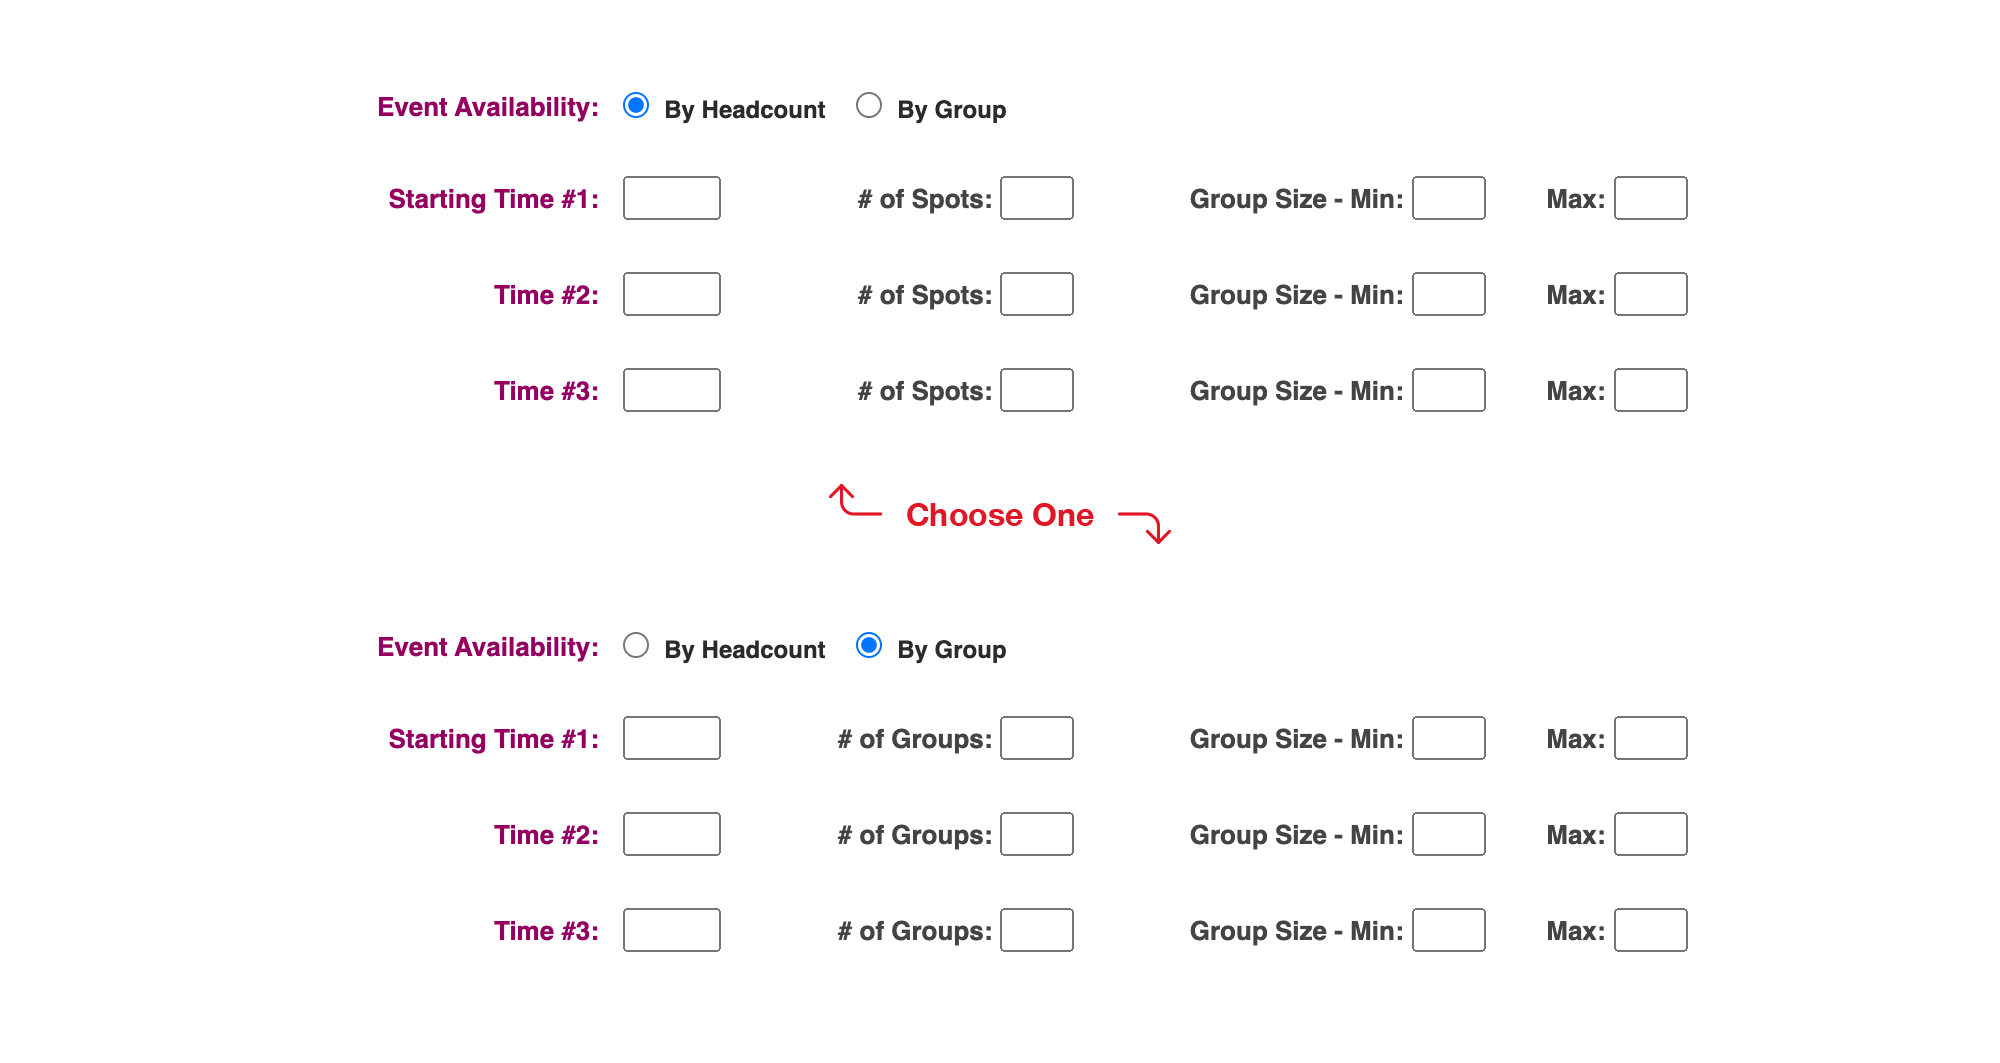
Event Availability establishes how many spaces an event will have on the calendar.
Once your customers start booking events, Event Availability is the basis used to calculate if an event can take additional reservations, and if so, how large they can be. There are two types of Event Availability: by Headcount and by Group.
By Headcount events use a total headcount number of allowable people to limit the total capacity of the event. This method will allow additional reservations up until the point the total headcount is exhausted. For example, a "by headcount" event with a "# of Spots" value of 50 will allow new reservations as long as the total headcount of all booked reservations doesn't exceed 50. If there were two reservations with 25 people each, the event would not allow any additional reservations, and the Public Calendar would display "0", meaning no remaining spaces.
By Group events use a total number of groups to limit the capacity of the event. So the headcount of various group reservations isn't a factor for establishing availability. For example, if a "by group" event had "# of Groups" value of 3, it will only accept reservations for 3 separate groups. Note: General Admission events do not support availability by group (create a Group Reservations event instead).
Whether you are using by Headcount or by Group availability, note that you can also create a minimum and maximum group size (Min and Max).
 BACK TO TOP
Event Pricing
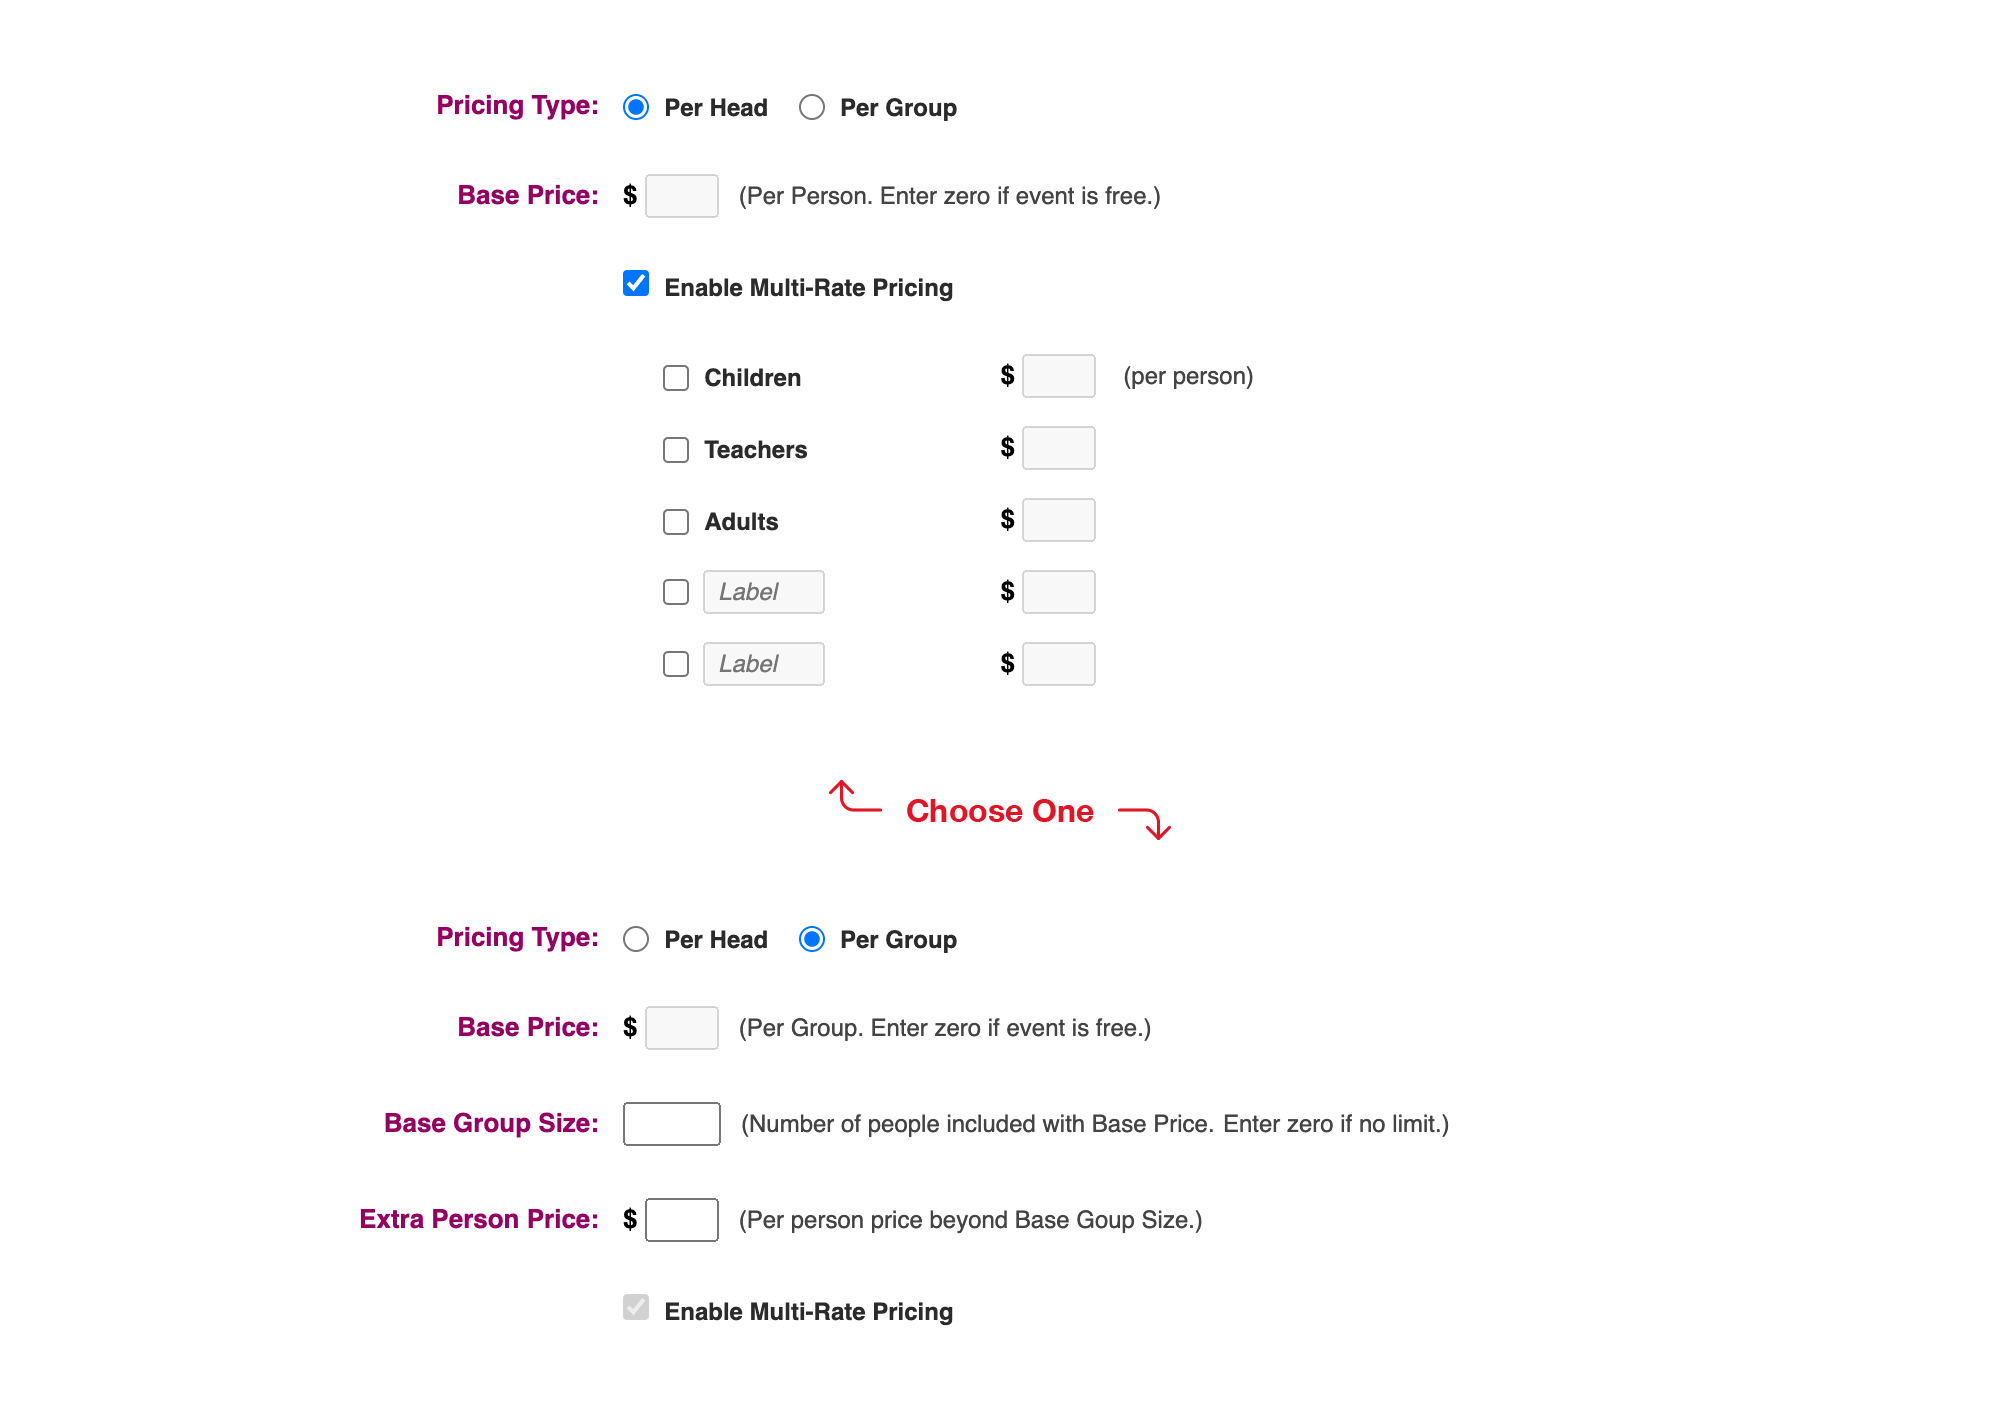
Pricing Type is the basis for calculating the price of a reservation.
The per Head method calculates the total price using a price for each person in the reservation (like $5 per student), and the "per Group" method uses a flat rate for each group (like classes of 10-30 students pay the same flat fee of $50). Note: General Admission events do not support pricing by group (create a Group Reservations event instead).
The per Group pricing method also includes the ability to set a "base group size." The "extra person price" allows you to charge an extra per-person rate for groups that are bigger than the base size (like $50 for the first 30 students and then an additional $5 per student).
 BACK TO TOP
Payment Options
With AgPRO Book-IT, you have a couple Payment Options. You can choose whether you require a credit card to make a reservation. Requiring a credit card to make a reservation does not mean your customers will be automatically charged. If you require a credit card, you can choose to require a deposit to secure the reservation or not. And if so, your deposit can either be a fixed amount, like $30 per reservation, or it can be a percentage of the reservation, like 50%. To charge the entire amount at the time the reservation is made, select "Percent of Total" and enter 100%.
NOTE that Payment Options are only available to customers who have payment processing enabled.
 BACK TO TOP
Reservations Extras and Add-Ons
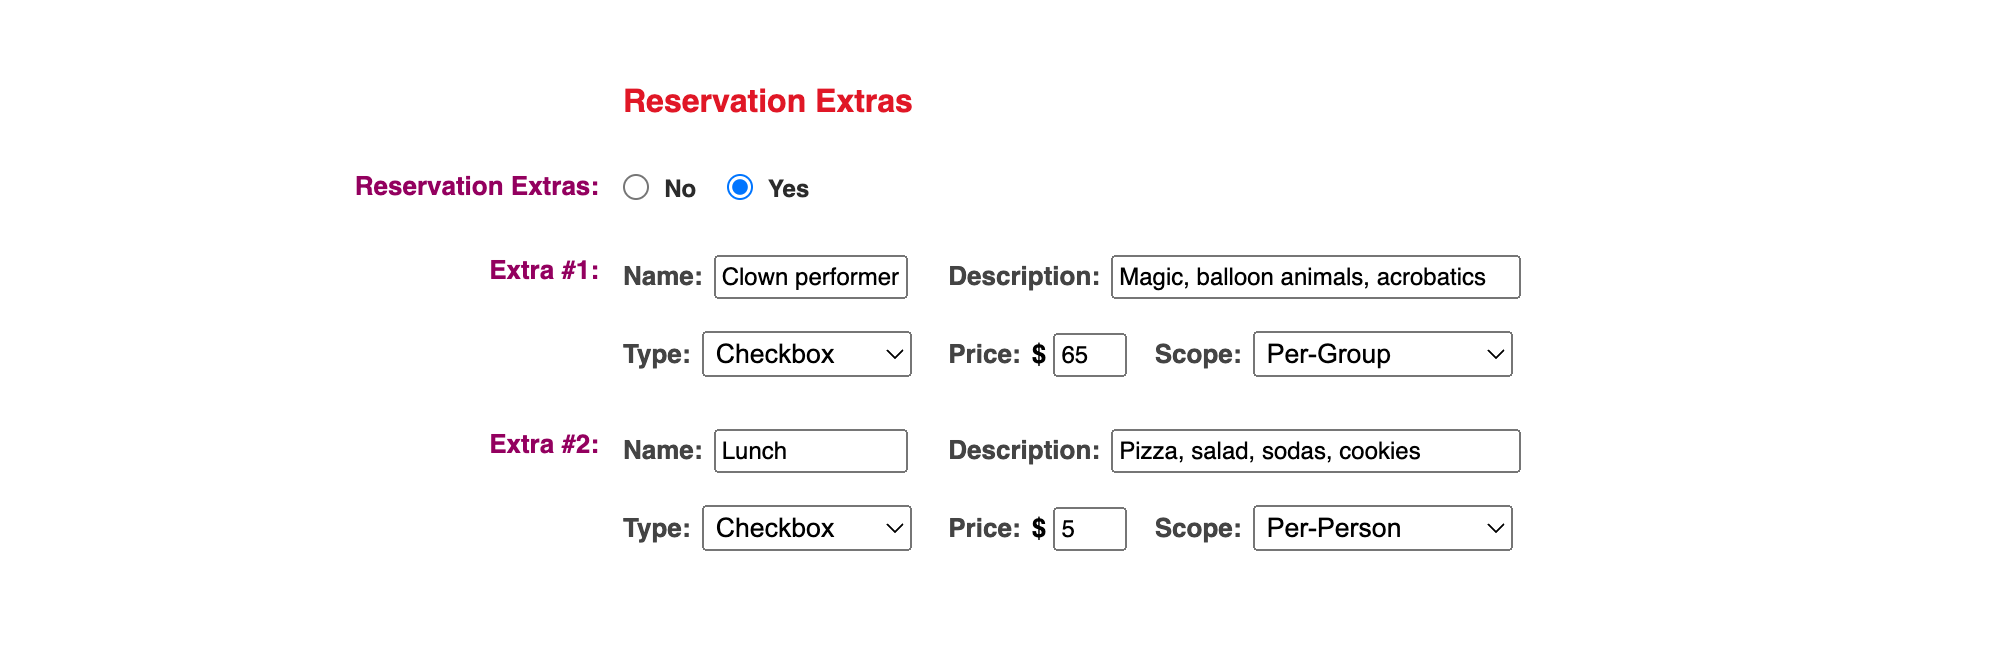
You can choose to offer "add-ons" to your visitors using the Reservation Extras section. Click on "yes" to see an expanded set of options. Here you can set a Name, Description, Type, Price, and Scope.
For example, maybe you want to offer a group the option to have a clown perform for the event. Since you have to pay for the clown no matter how many kids are there, maybe you offer the clown performance for a fixed fee per group (see example below).
Or maybe there's a great pizzeria not far from your farm. Since you'll need pizza slices for each visitor, you can offer this add-on as a per-person price (see example below).
After you've settled on all your details and options, click on Create Event. With this final step, the event is automatically added to your public calendar. To check your work, go to your website and click on the "online booking" text link we have provided and you'll find your new event right away on your public calendar. Congratulations, you're already using AgPRO Book-IT like a pro.
BACK TO TOPReservation Lockout Period
If you choose, you can set a lockout period (minimum advance notice) before an event to prevent last-minute reservations and to help ensure adequate staffing, supplies, etc. for an event. Enter in any number of days prior to the event, and AgPRO Book-IT will not accept new reservations during that time. A lockout period of "0" means there is no lockout period and reservations will be accepted right up until the event begins.
 BACK TO TOP
Multiple Calendar Views
By default, all Events will be visible on your calendar. But AgPRO Book-IT allows for you to have up to four different calendar views. For example, maybe you want to have one calendar to show birthday parties and a separate calendar for field trips. Changing the setting from "0 - Visible on All Calendar Views" allows the event to display on a specific calendar view only. The web address for accessing the defined calendar view is shown below your selection, allowing you to send a visitor from your website directly to a particular calendar view.
 BACK TO TOP
Event-Specific Confirmation and Reminder Emails
The confirmation email and reminder email choices you made for your calendar earlier in Settings apply to all reservations by default. When creating a new event, you can choose to override your default choices to create event-specific confirmation emails and reminder emails. Maybe you have a cancellation policy for this particular event that is different from other events, or maybe you want to give driving directions to a different part of your farm for a particular event. The text you enter and the reminder email options you select here will apply only this event or event series, meaning your defaults will not be changed. Here you can also choose whether to attach a PDF invoice to the confirmation emails.
Managing Your Calendar
BACK TO TOPEditing an Existing Event
Once you've created an event or a series of events, you can always make changes later to the event details for whatever reason. From the Dashboard or any other page, click on the Manage Events link at the top of the page.
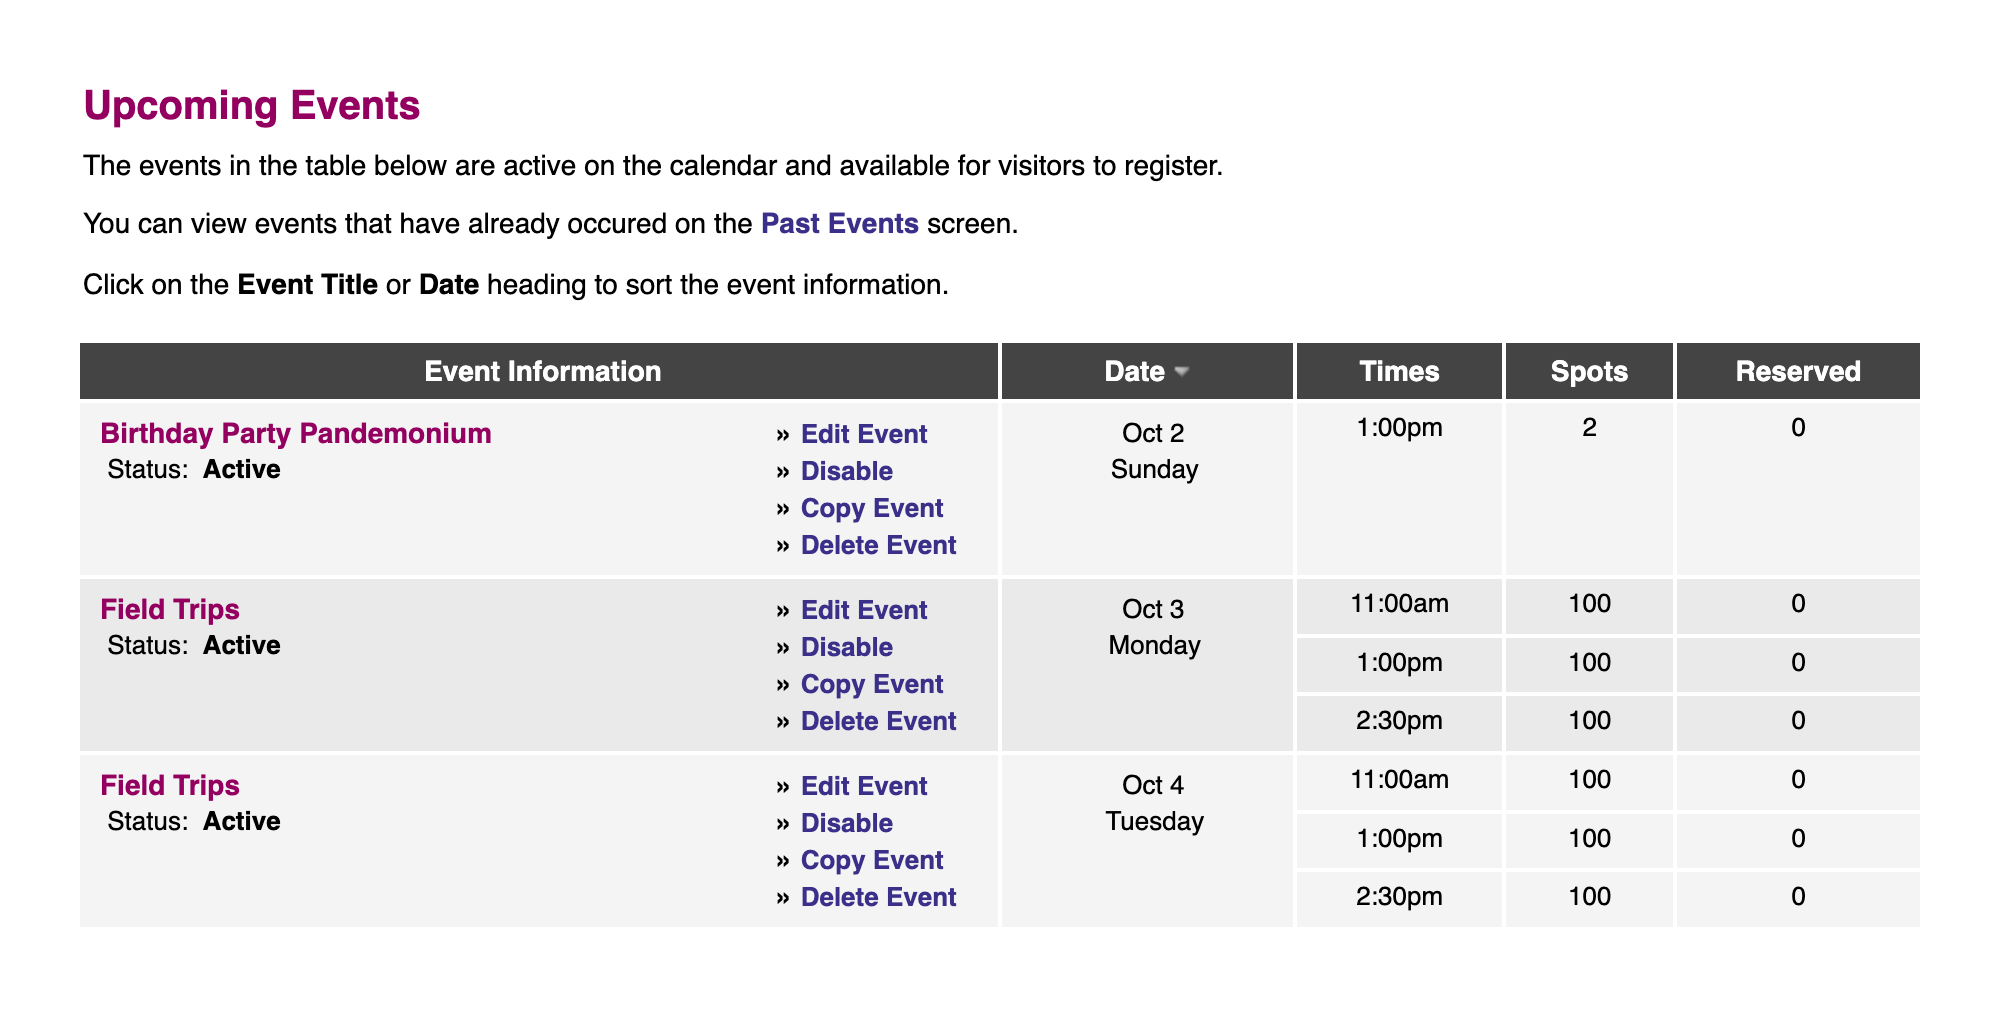
Here you'll see a list of the events that you have created, including an up-to-the-minute summary about the number of reservations taken for a particular event. Along the right side of a particular event entry, you'll find links to Edit Event, Disable, Copy Event, and Delete Event.
To delete and event, click Delete Event. This will permanently remove that event from appearing on your public calendar. Click the Disable link to temporarily hide an event from the Public Calendar without actually deleting the event. You can return later and click Enable to display the event again on your calendar.
To edit the details for an event, click Edit Event and you will see the edit page for that particular event that looks very similar to the Create Event page. You can change the time, pricing, description or any of the other details of an event.
When you're done editing the details for that event, you must click on the Update Event button at the bottom in order to save your changes. You can always return to this edit page again to make additional changes if necessary. After clicking the Update Event button, your changes will automatically be reflected in your public calendar.

If you already have a reservation for an event you're trying to edit, you'll receive a notification reminding you to contact your customer with any important update or new information. AgPRO Book-IT will not notify your customer that you've changed the event details.
BACK TO TOPCreating a Copy of an Event
If you've already entered all of the important details for an event and would like to create a copy of the event, click on Copy Event. You'll automatically be navigated to the Create New Event screen and all of the text fields and options will be already selected for you. Make any edits to the event details (like a new date or time), and click on Create Copy to add the event to your public calendar.
 BACK TO TOP
Editing or Cancelling a Customer's Reservation
Customers cannot cancel or edit their own reservations. After making a reservation online for an event, your customers will receive an automated email that includes the phone number you have provided and the email address from their email confirmation. You or someone on your staff should plan to be available to respond to phone calls (or at least return messages) and check email in case a customer wishes to make a change.
To edit the details of a particular reservation, Click on the Reservations link at the top of the page. Here you will see a list of all the reservations you have taken in the table below. Or use the search feature to find a particular reservation using the customer's name or their organization.
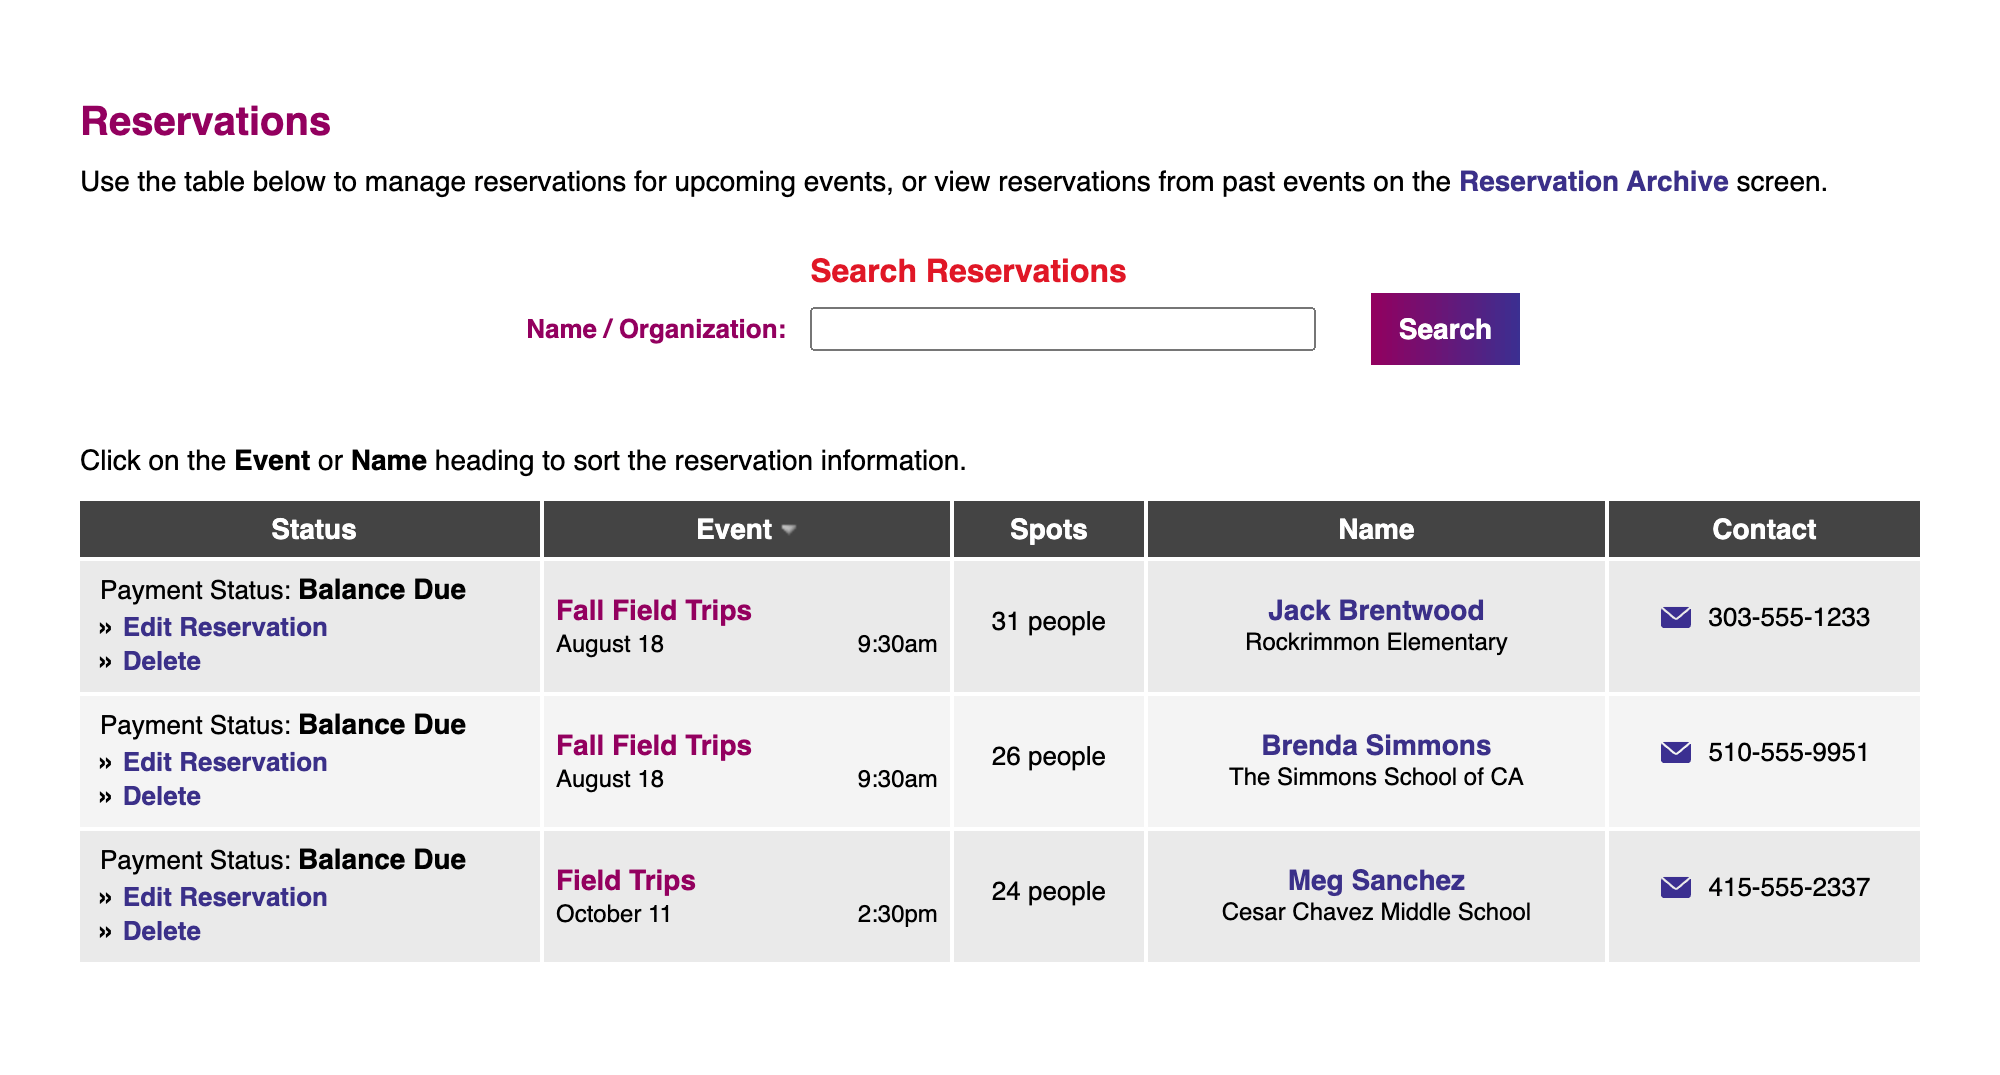
Click on the name of the reservation you wish to edit, or click Edit Reservation. You can also delete a reservation from an event by clicking on Delete, and the space that was taken by the reservation will become available again in the event.
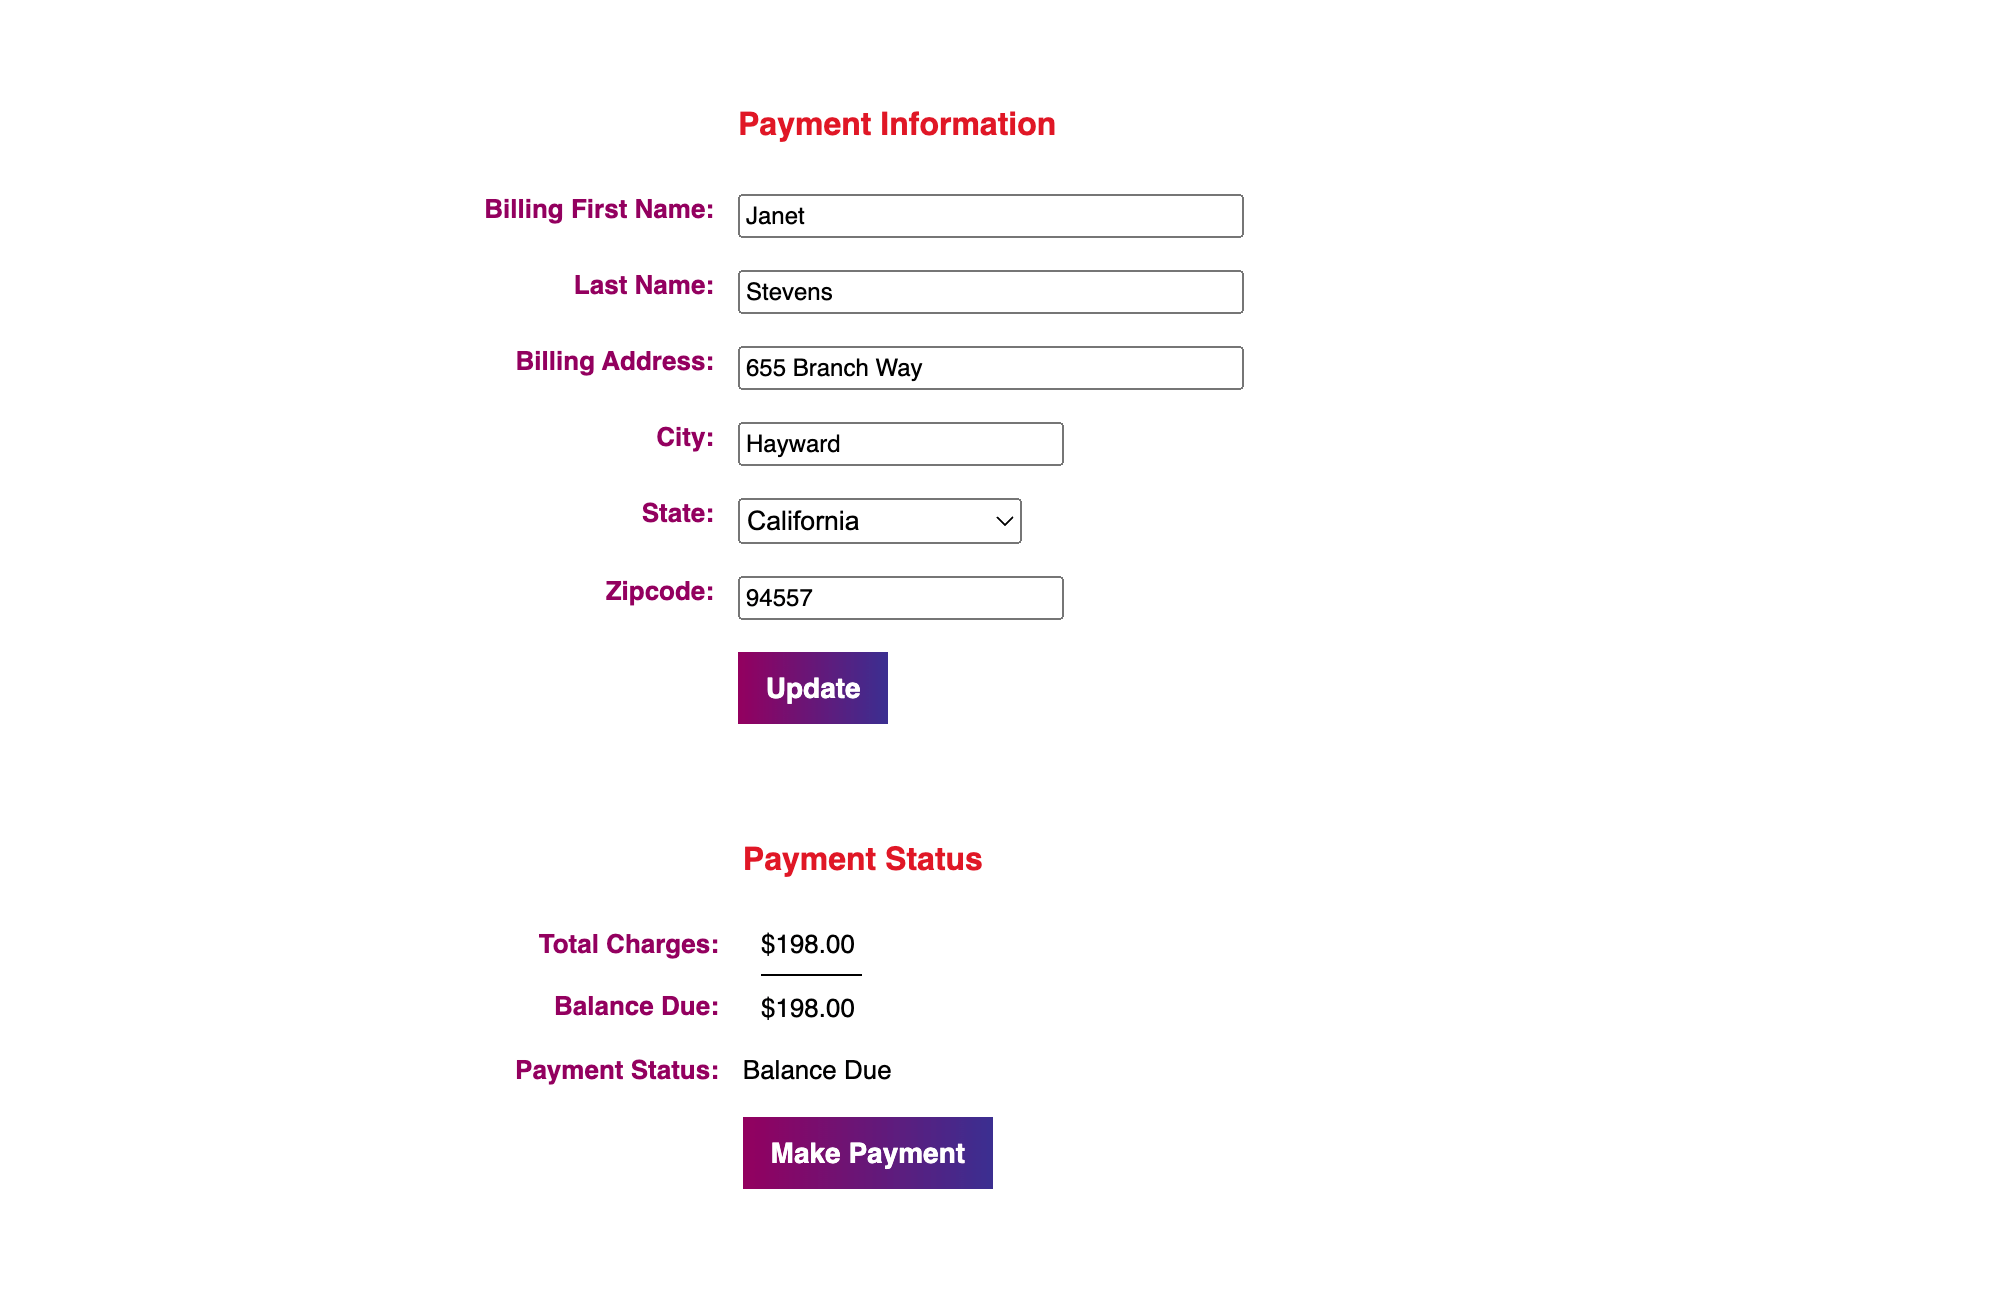
Once inside the individual reservation, make whatever changes are necessary to a particular section (Reservation Details, Payment Information, Payment Status). You can transfer a reservation to another time or day by clicking on the Change Date/Time link and selecting a new date and time. Each section has its own Update button, so be sure to click Update for any section to which you've made changes.

While editing a reservation, there's even a text box to track any "special requests" made by your customer and a separate box for internal "reservation notes" that are not visible to your customers.

If you make changes to more than one section, be sure to click Update for each section. When you edit a reservation, AgPRO Book-IT will send an updated confirmation email, a feature you can disable using the "Re-send Confirmation Email to Customer" check box, just in case you make only a minor change to a reservation. Note that your customers will automatically receive an updated confirmation whenever their reservation is deleted or transferred to a new day/time. Here you can also choose whether to attache a revised PDF invoice with the confirmation email.

How Reservations Work for the Customer
Once you have set up an event, we highly recommend that you access the calendar from your website, as a customer would, and make some practice reservations. Once you create some practice reservations you can easily delete them later, and this gives you a very clear idea of the steps your customers will be making. This process also allows you to learn how to edit and/or delete a reservation (without affecting a real customer's reservation).
Remember that all credit card information is safely stored but no credit card can be ACTUALLY CHARGED from the customer side of the program. No one except you or another administrative password holder can actually CHARGE a credit card, and then only if you have arranged in advance for credit card processing (see your Customer Questionnaire).
If a customer needs to change their reservation, they will have to call you at the number you provide or send you an email. Customers cannot edit or delete their own reservations.
If a customer is not online or is unwilling to use the online reservation system, you can book them from your office so that all of your reservations are still stored together in one place for easy record keeping. Simply visit your website, click on the link for your Public Calendar just as a customer would do, and input their information either while the customer is still on the phone (or take notes and do it later).
In order to delete your practice reservations, go back to the Dashboard and follow the steps for deleting reservations outlined above.
How Reservations Work for You
To review your reservations, click on Reservations at the top of the page. This will give you a list of all the reservations by event and by customer name. To review events as a whole, select Existing Events, which will allow you to see all the upcoming events with the total number of reservations made so far.
BACK TO TOPScheduling
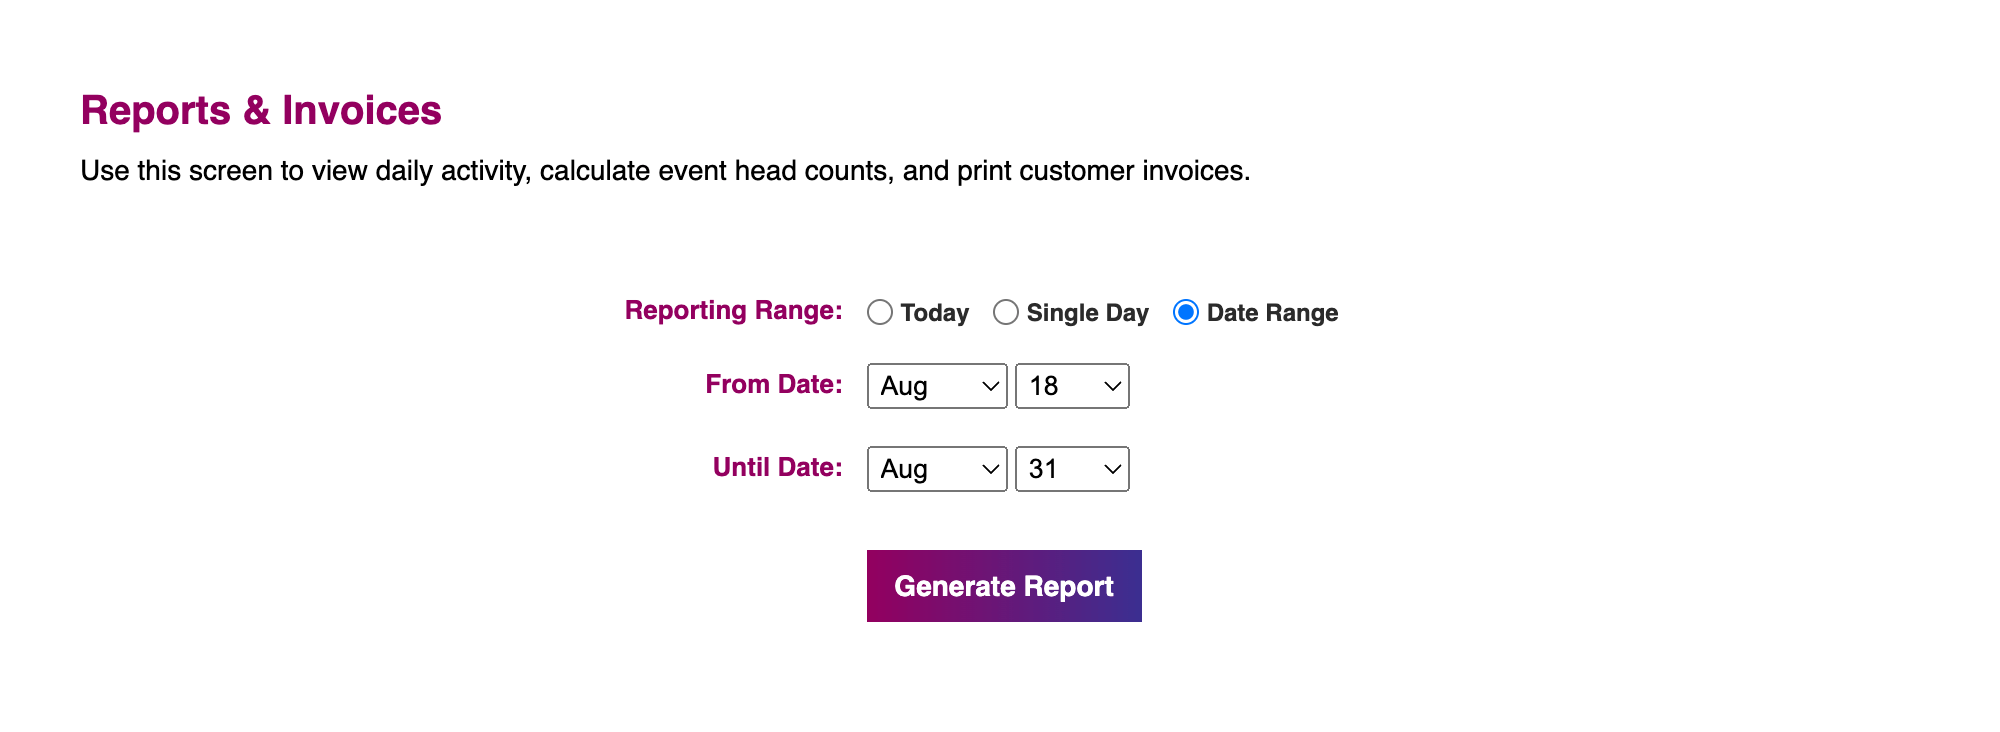
Need to know how many people are going to show up this week, so you can schedule the right number of teachers and cashiers? Do you need to double-check the number of bag lunches you will need for Thursday? Can you save money by rescheduling the one group you have on Monday to Tuesday, and then take a three-day weekend? The "Reports & Receipts" link allows you to review reservation information by the single day, the week, the month or whatever date range you wish. Information is arranged by event and then by each customer name registered for the event. The page for generating reports is shown below:
 BACK TO TOP
Reporting
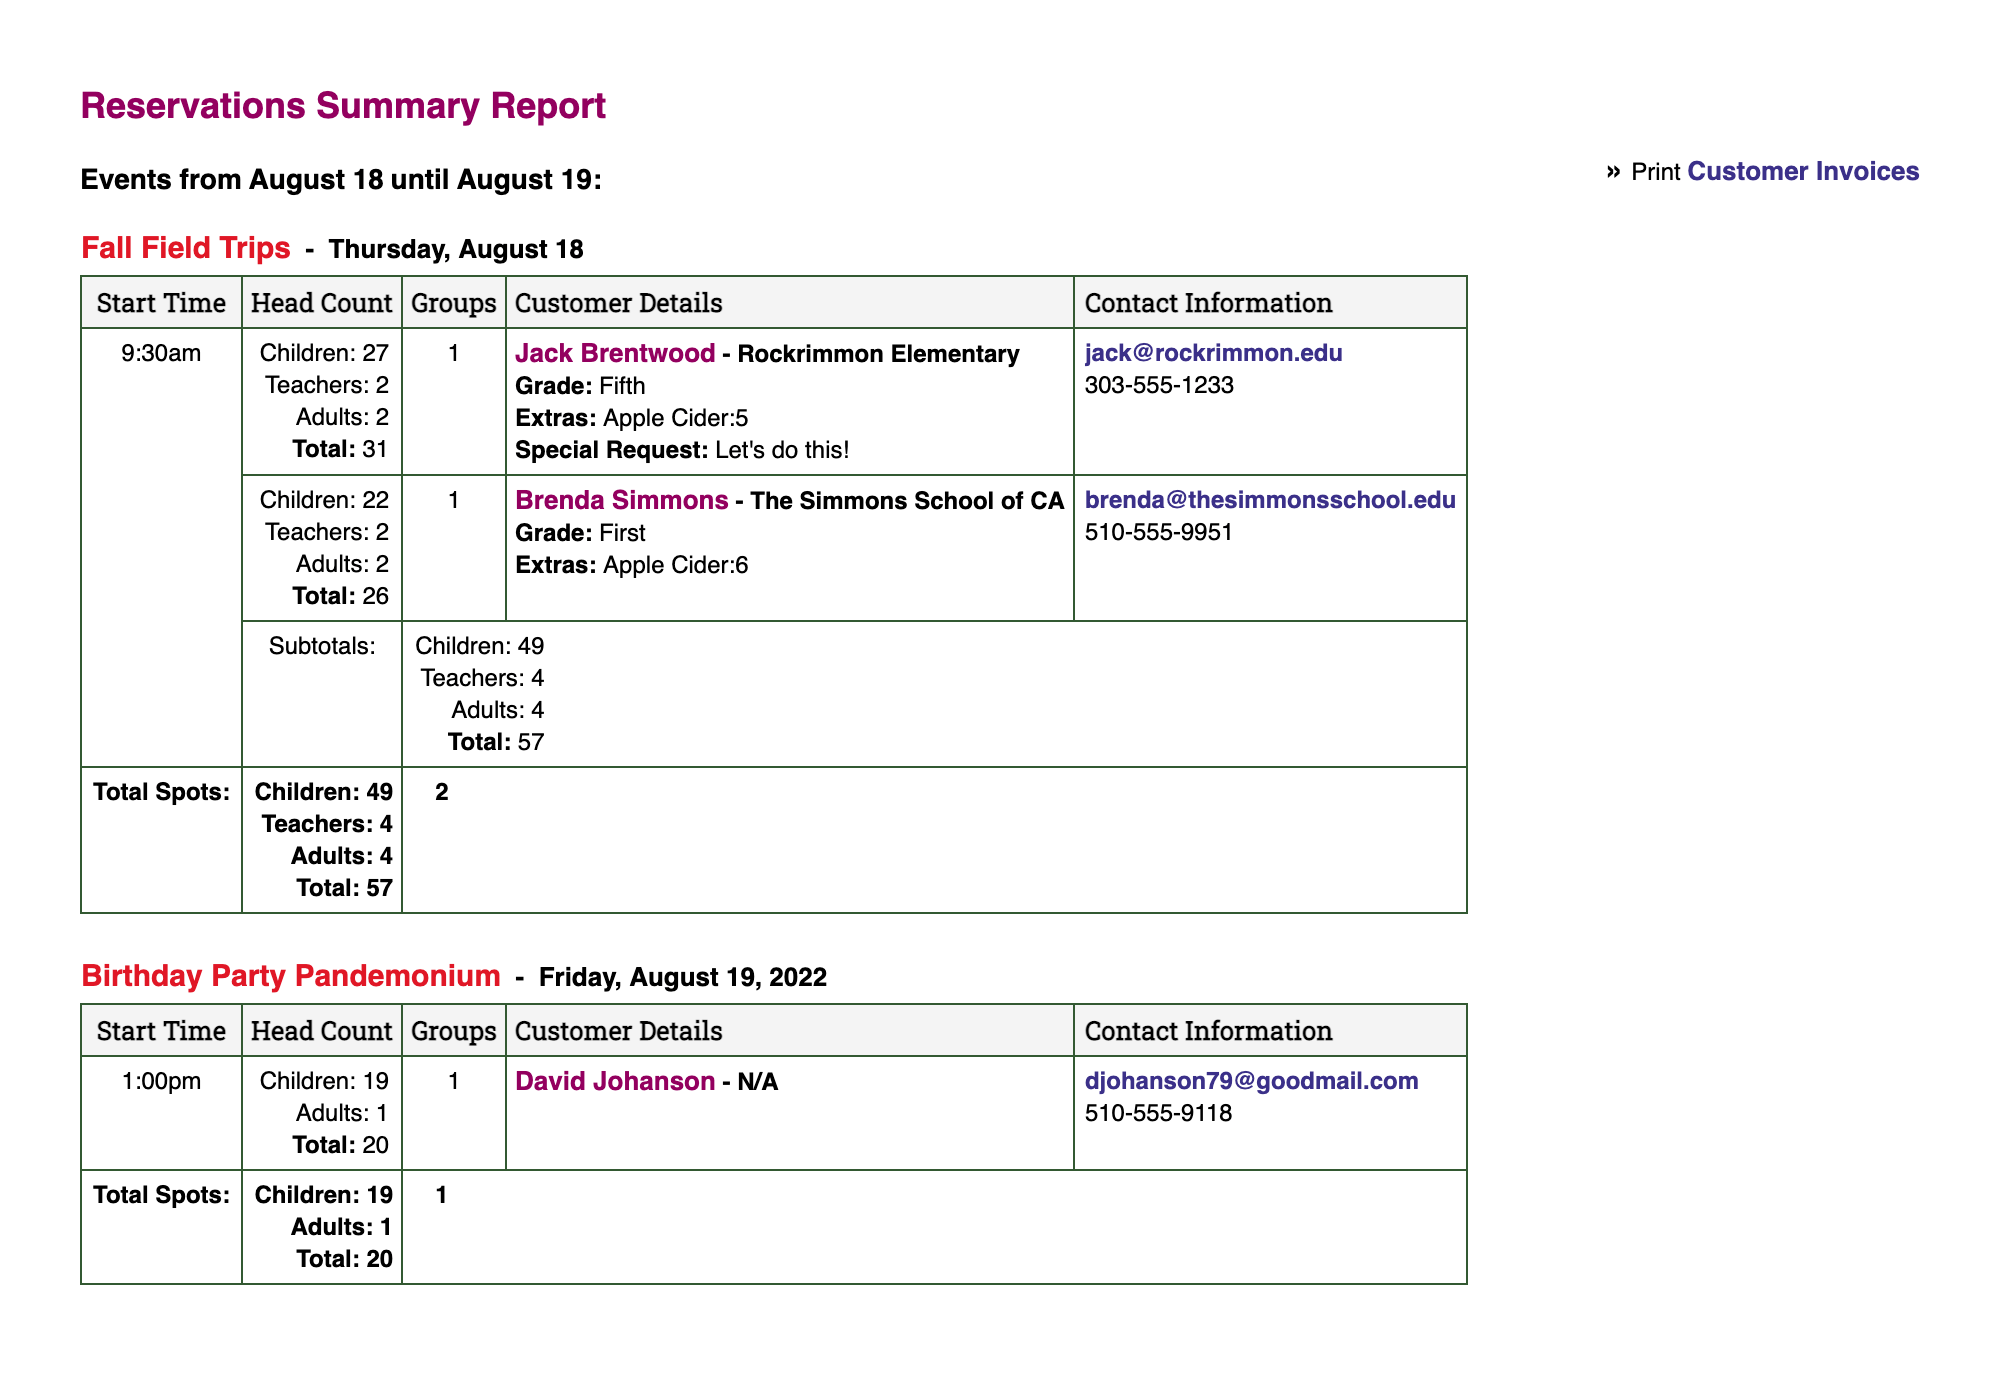
A sample report is shown below. Use reporting to summarize total attendance, to compare attendance against receipts, to check the success of your marketing efforts and to target more marketing - for example, which schools did NOT make a reservation? Perhaps you could send a flyer out to the first through third grade teachers at the schools that you DON'T see on the list. Or send a personalized "thank you" note to the ones that DID come. All the information is right there! You can run totals before and after the events, check on reservations as they come in, or find all the contact information for the day's guests all in one place.
 BACK TO TOP
Invoices and Receipts
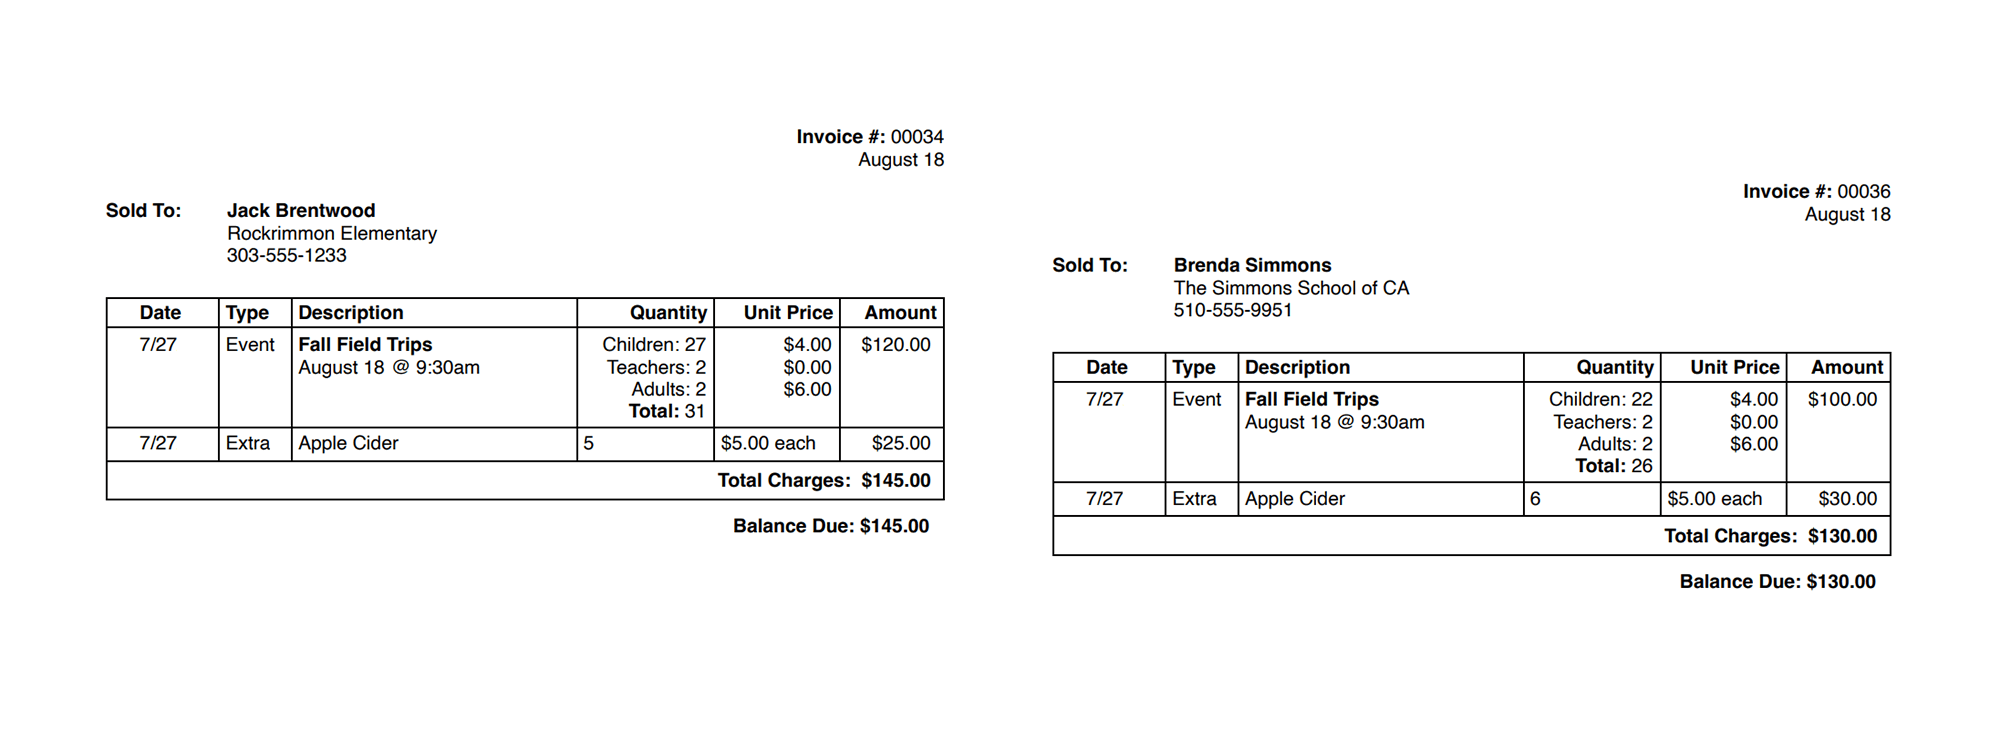
At the top of your report pages, a Print Customer Invoices link allows you to generate invoices and/or receipts for each customer registered for an event. Just click on the "Print" button to print these pages. If a customer has already paid for the event, the printout will be labeled as a "Receipt," and if there's a balance due, the printout will be labeled as an "Invoice." The two sample pages are shown below sized to fit the website, but the actual paper invoice is formatted for the standard 8.5" x 11" computer printer paper.
 BACK TO TOP
Exporting Customer Information
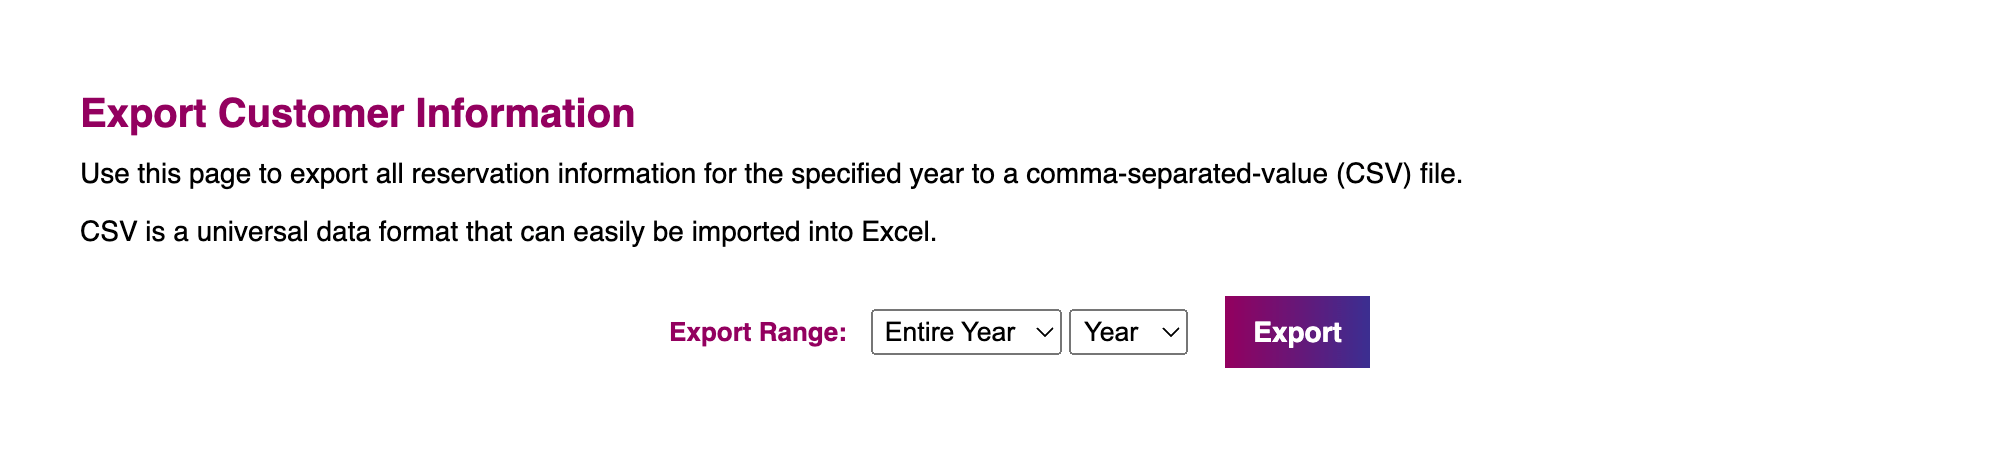
At the end of the season, or at any time, you can export your customer information to add to your mailing list or for your records. Click on Export, select an entire year or a just one month for a particular year, and then click the Export button to automatically download the database to your computer. Your customer information is saved in a CSV document (a comma-separated-value file), which will open in Microsoft Excel and in many other spreadsheet programs. Downloading to your computer will not affect the information stored in your dashboard. You'll still be able to view your information there too.
Receiving Customer Payments
On the day of the event (or afterwards), you can use AgPRO Book-IT to process credit card payments if you already have a merchant account set up with a credit card processor. Or you can use your POS to take cash or a check and use AgPRO Book-IT to mark the reservation as paid.
BACK TO TOPPayments for Group Reservations
In the Dashboard, click on the Reservations link at the top of the screen and then click on the name of a particular reservation. This will take you to the same screen as Edit Reservation.
Before collecting payment, you can always update the quantity of the group. For example, maybe one of the kids was sick that day. Change the quantity info and click on the Update button for that section.
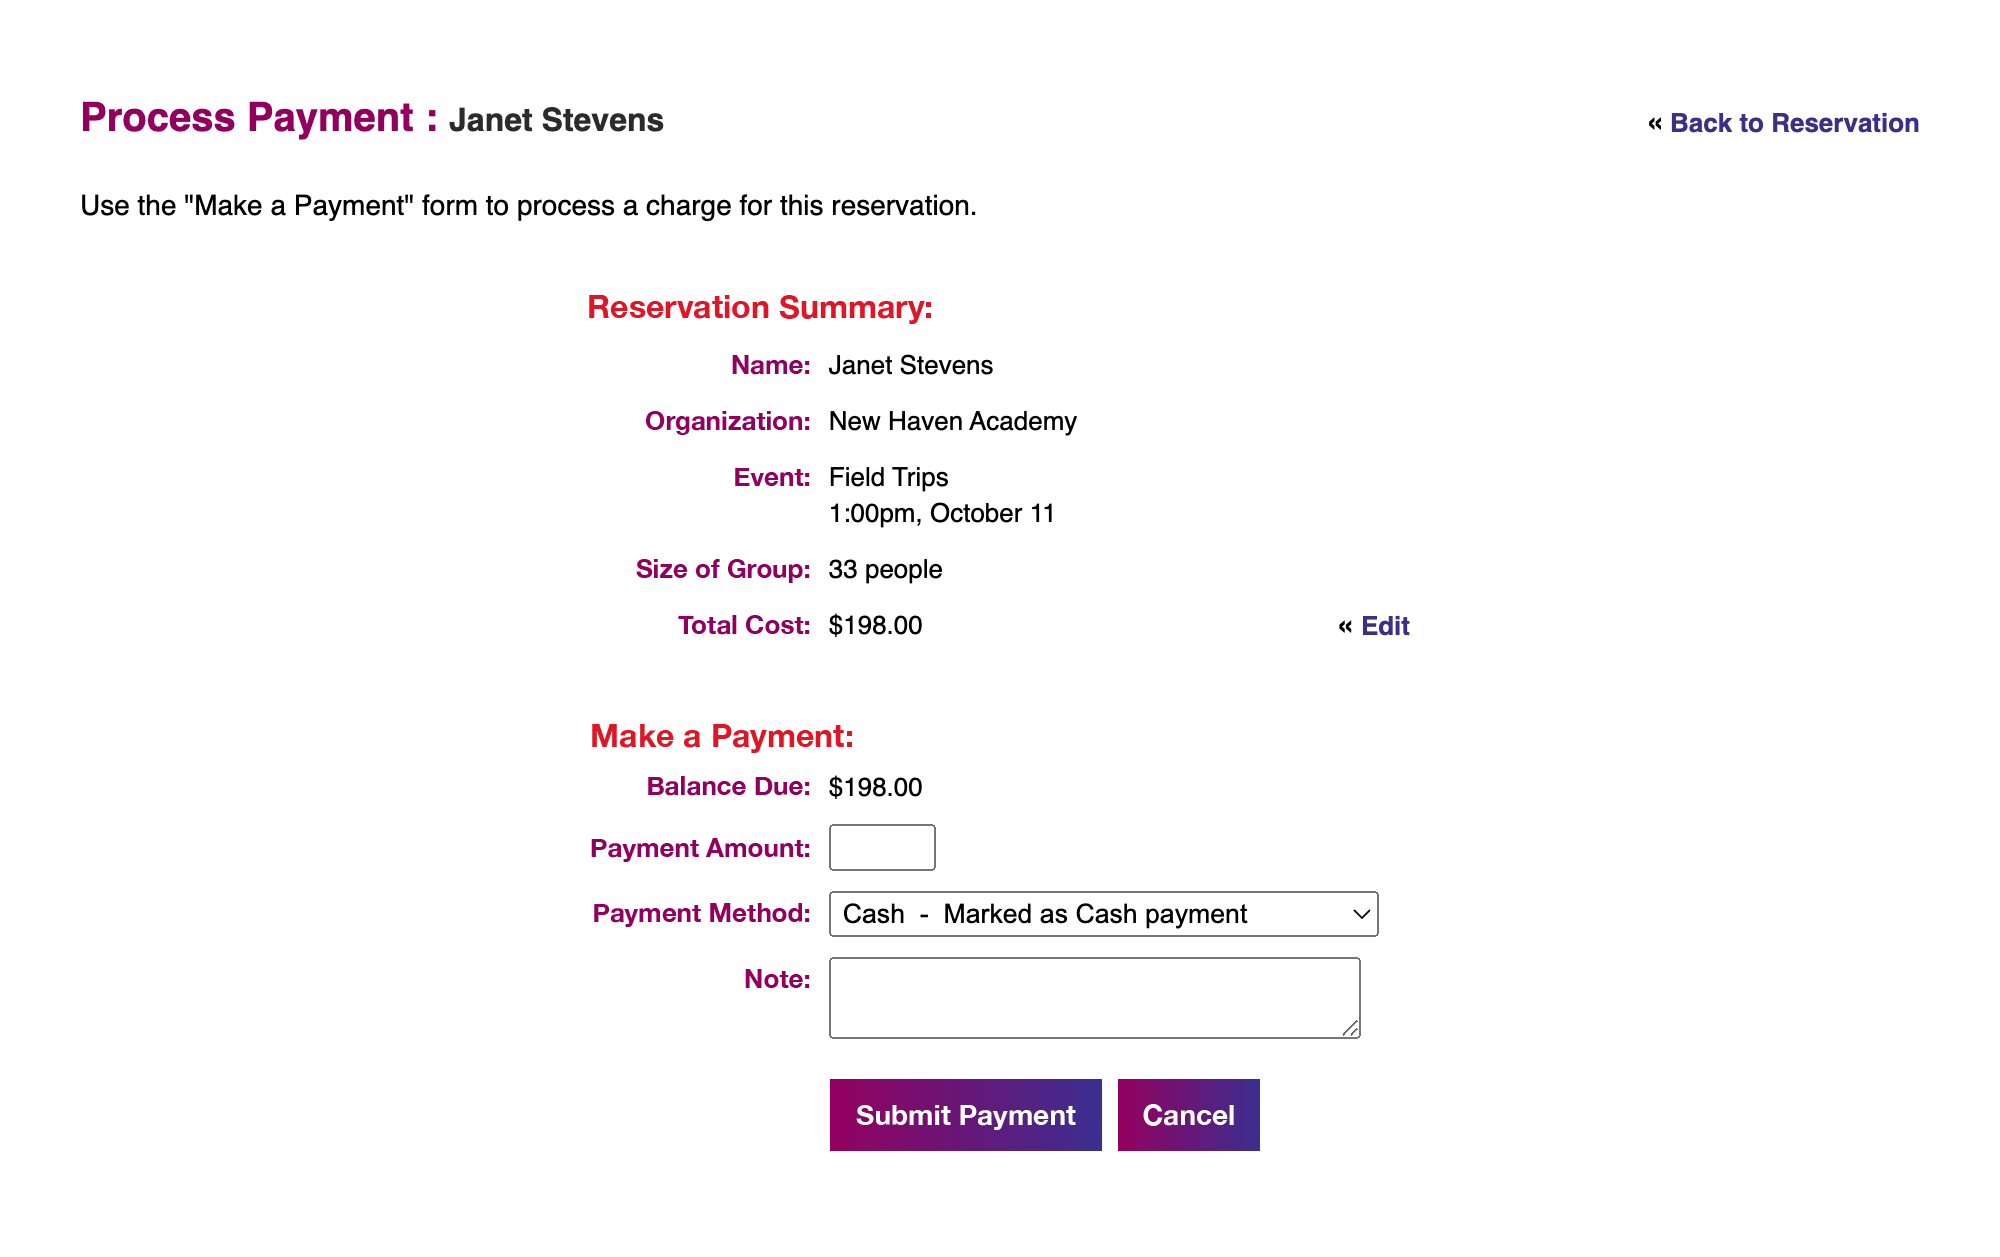
Now scroll all the way down to find the Make Payment button.
A new screen will appear, and you can select from various options for receiving payment. There's a feature you might find handy here. Let's say the day was rainy and the kids didn't get to play outside, or maybe your hayride wagon broke down that morning. You can always make a manual discount right on the spot before processing payment. Select "Discount - Reduces Balance Due", enter the amount, and then click Submit Payment. You'll see the Balance Due figure is now adjusted accordingly.
If you have provided your credit card processing information to us, and if your customer was required to enter a credit card when booking, you'll see "Credit Card - Use Credit Card on File" as an option. Otherwise, enter the information and hit Submit Payment. Once you submit the payment, wait for the browser to finish loading in order for the processing to complete. Please do not cancel the page load or use the browser "Back" button.
 BACK TO TOP
Payments and Check-In for General Admissions
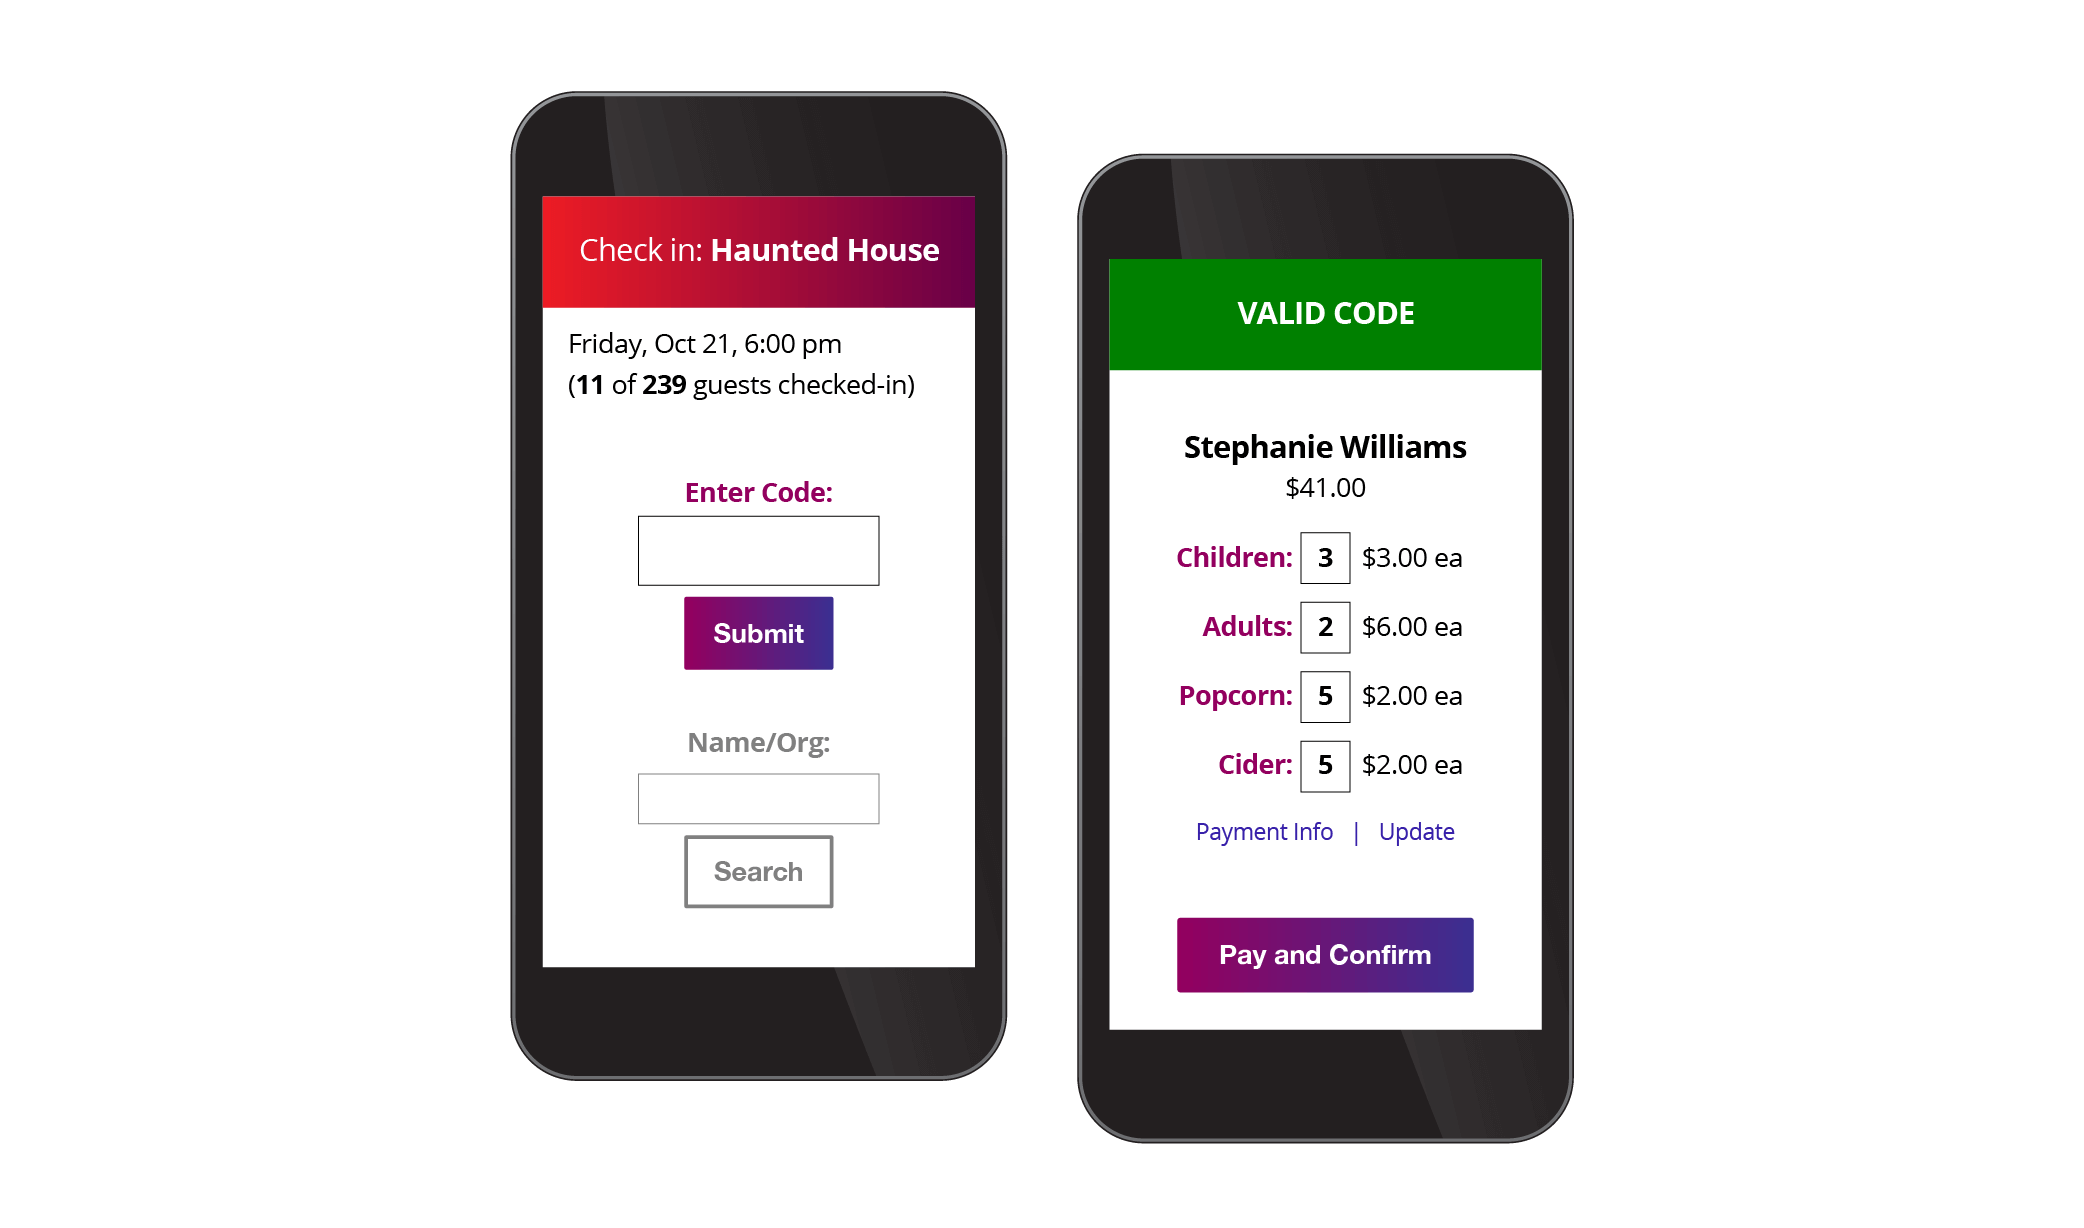
Check-ins for General Admission have been streamlined to keep your entry line moving. In the Dashboard, click on the Check in guests link in the Upcoming Events section using any Internet-connected device (no special reader device or hardware is required).
Your guests will receive a four-digit code in their confirmation email. Each four-digit code is a unique combination of four letters (no numbers or special characters). Enter the guest's four digit code and click Submit. On the next screen, confirm the name on the reservation by clicking the Confirm button. If your guest doesn't have the confirmation email, you can search by the last name on the reservation. If your guest attempts to give you a bogus code, AgPro Book-IT will display an error message.
Once you're in the reservation, you can update the quantities, change the payment info (or add the payment information if it was not required at the time the reservation was made, or click "Confirm and Pay" to process the payment.
Archives
AgPRO Book-IT stores information about events whose date has passed in the Archives. You can use the Archives to confirm sales, plan for next year, or retrieve information. This is a handy way to keep only the most current information at your fingertips, while still saving the history of your reservations in an easy-access format. From anywhere in the Dashboard, click on the Past Events link at the top of the page. Depending on what information you're looking for, creating a report might be easier.